What is Hugging Face?
Hugging Face is the most popular open-source platform for machine language technologies. The NLP-focused startup offers an open-source platform and a variety of private models, datasets, and Spaces on a free as well as subscription basis.
It is a place where data scientists, researchers, and ML engineers can build, train, deploy ML models, and collaborate with peers.
What is Access Token in Hugging Face?
As the name suggests, the user access token in Hugging Face is the token of access for Hugging Face services. It is the only way to authenticate the local machine, an application, or a Google Colab notebook that requires access to the Hugging Face’s services.
How to Get Access Token in Hugging Face?
Creating an access token in Hugging Face is simple and easy. To get an access token in Hugging Face, go to your “Settings” page and click “Access Tokens”. Then, click “New token” to create a new access token.
Steps to Get Acess Token in Hugging Face
1. Sign Up for Hugging Face
Go to the Hugging Face website and click “Sign Up”, which is located in the upper right corner of the website.
You can sign up for Hugging Face only via your email address. If you are working in an organization, you need to give your organization’s email address to find and join your company/ team.
If you are an individual researcher, you can sign up via your personal email address.
Then, set a strong password for your account and click “Next”.

2. Create an Account
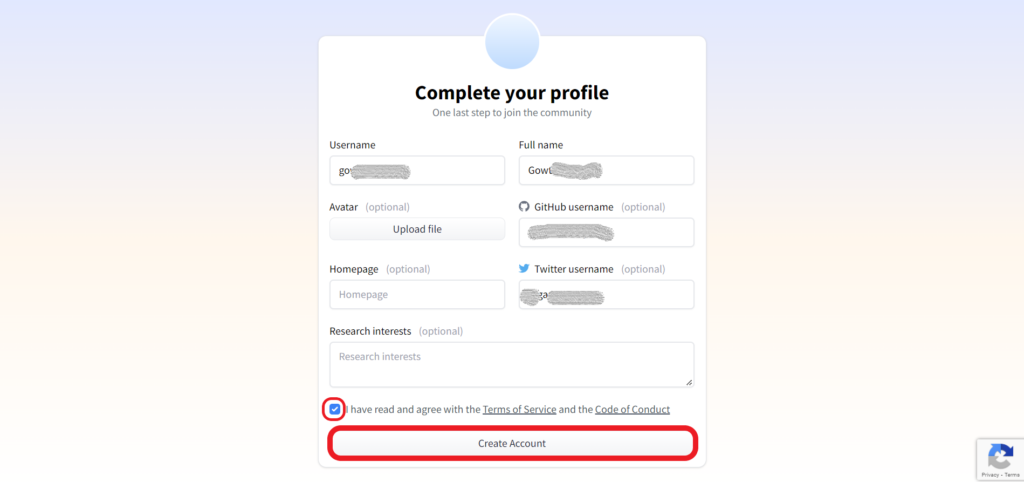
To create an account, it is essential to enter the username and your full name. Adding an avatar, and entering GitHub username and Twitter username is optional.
After reading the Terms of Service and Code of Conduct, select the checkbox given.
Lastly, click “Create Account”.

3. Confirm your Email
Now, you will be able to get into the Hugging Face. To get the new access token, it is essential to confirm your email.
If you have not confirmed your email, you cannot generate an access token. Hence, head to your inbox and verify the email received from Hugging Face.
4. Go to Settings
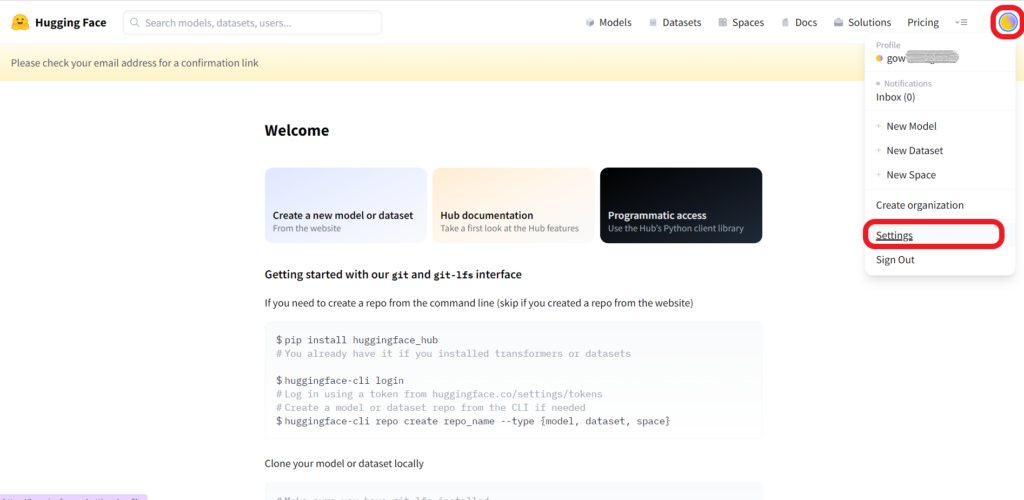
After verifying the email, you need to click the “Profile icon” located in the upper right corner of the webpage.
Then, navigate to “Settings” and click on it.

5. Get the Access Token
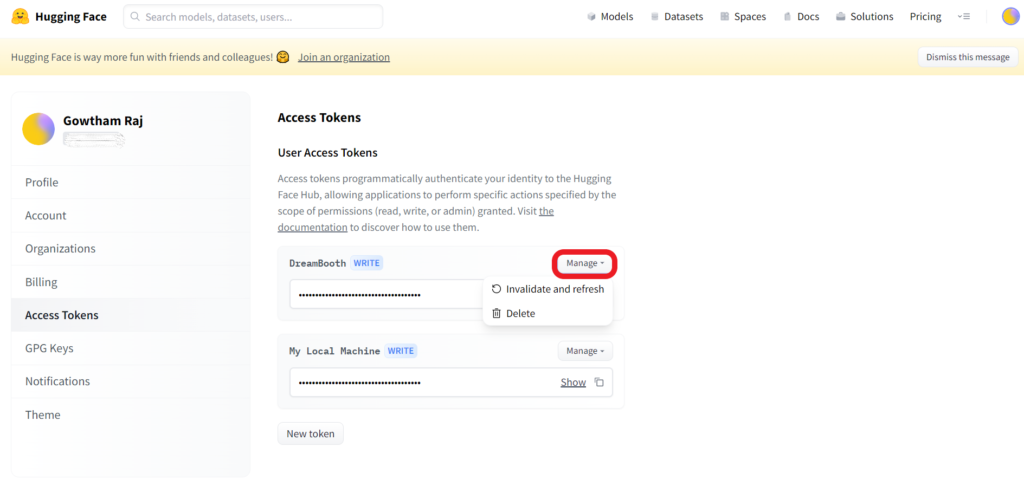
On the Settings page, you will be able to find the “Access Tokens” on the left-hand side. Click on it.
After clicking on the Access Tokens, there will be a button called “New token”. Click on it.

Now, you need to give this token a name. My suggestion is that if you are generating this token to access the Hugging Face service from Colab notebook, give it the name “Colab Notebook”; if you are accessing the service from your local device, give it a name as “Local Device” to manage the token easily.
Next, you need to select the role for this token from the given dropdown. If you only want to read content from Hugging Face, select the “Read” option; if you want to train a model or modify a model card.

6. Manage Tokens
You can invalidate and refresh the Hugging Face token as well as delete it according to your requirement.

Best Practices to Keep While Creating Hugging Face Token
Create a separate access token for each platform to easily manage the tokens without affecting the other. I.e.,
- For a local machine
- For Google Colab notebook
- For custom inference server
Also, only give the appropriate role (Read or Write) to the tokens you create.
Conclusion
Creating a token is easy and it is important to access the Hugging Face services from other platforms, such as Google Colab notebook, a Local machine, or a custom inference server.
After creating the Hugging Face token, you can use it in three ways:
- For authentication purposes or in the replacement of passwords to access the Hugging Face Hub with git.
- While calling the Inference API as a bearer token.
- While using Hugging Face Python libraries, such as transformers or datasets.
