
In this article, you will learn what is DreamBooth, how it works, and how to use it without owning a GPU with 24 GB of VRAM. No installation is needed!
What is DreamBooth?
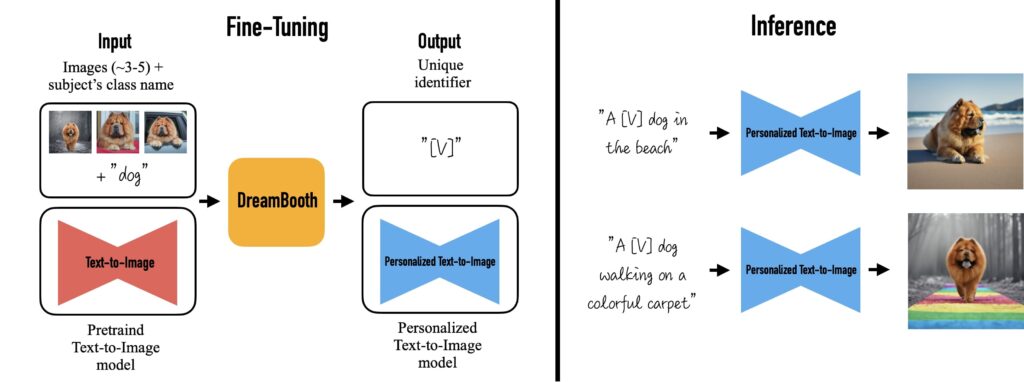
DreamBooth is a subject-driven AI generation model that fine-tunes the results of text-to-image diffusion models or new images.
DreamBooth does stuff that the other diffusion models can’t or lacks to do. The other diffusion models aka AI art generators, such as DALL.E 2, Midjourney, and Stable Diffusion have a lack of contextualization of the subject.

DreamBooth has the capability to personalize the results of both text-to-image diffusion models and any image given as input by users.
How Does DreamBooth Work?
With a few images as input (usually 3-5 images), DreamBooth generates subject-based personalized images with different contexts with the help of tweaked Imagen and a few other diffusion models.
Once images are given as input, the tweaked Imagen and other diffusion models find the unique identifier and tie it to the subject. At inference, the unique identifier is used to synthesize the subject in different contexts.
How to Use Google’s DreamBooth?
In this article, you will learn to use DreamBooth in the Colab notebook. In case you want to use DreamBooth in a non-coding environment with an easy-to-use interface? Read our article: Use Google’s DreamBooth: No Code and No Colab.
- Prepare Input Images
- Head to Google Colab Notebook
- Get Access Token from Hugging Face
- Run the Colab notebook
- Check the Output in Google Drive
1. Prepare Input Images
If you want to turn yourself into AI art, take at least 5 clear pictures of yourself and be ready to upload them into the Colab notebook in the following step.
Giving 200 images is good, more than that is better. If you give a very less number of images, such as 5 and above, the code itself generates the input images that need to be trained.
Since there is no limit to the number of images to be uploaded, you can go with any number. Take a few mid-size photos, and full-size photos from different angles with different lighting. At the same time, avoid photos with low or poor lighting.
In case you want to train the Dreambooth with any celebrity photos, you can do so. If that is the case, ensure to collect quality images with different angles of your favorite celebrity.
2. Head to Google Colab Notebook
Currently, there are three Colab notebooks are available to run DreamBooth with Stable Diffusion.
List Colab notebooks to train and generate images on DreamBooth:
- Hugging Face – To train: https://colab.research.google.com/github/huggingface/notebooks/blob/main/diffusers/sd_dreambooth_training.ipynb; To Generate: https://colab.research.google.com/github/huggingface/notebooks/blob/main/diffusers/sd_dreambooth_inference.ipynb
- ShivamShirao – It uses 17.7 GB of VRAM and is twice as fast as the previous one. Github and Colab notebook.
- TheLastBen – This notebook from TheLastBen uses only 12 Gb of VRAM and is +65% fast compared to the other two notebooks. Github and Colab notebook.
Considering the speed and usage pf VRAM, I will be using the TheLastBen Colab notebook in this article to train and generate images.
If you are not familiar with the terms Github and Colab, please don’t be intimidated by them as I have explained the process as simple as I can.
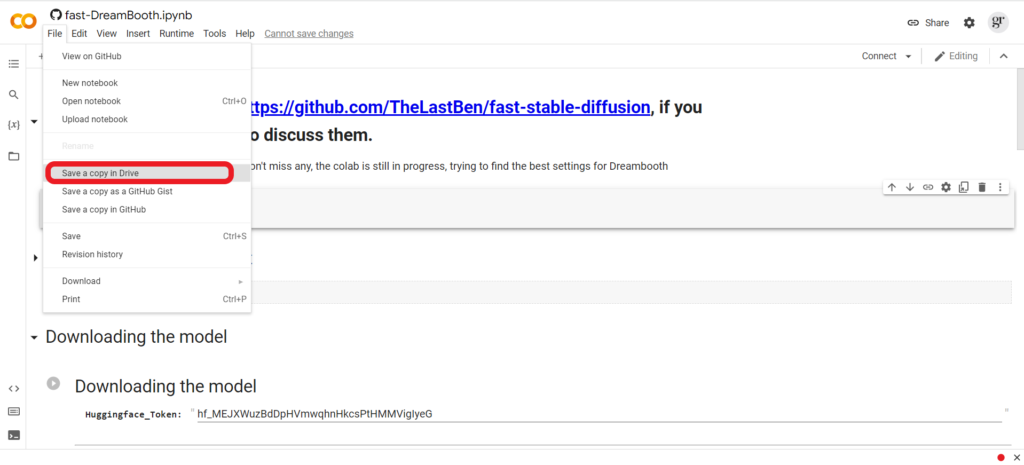
Open the TheLastBen Colab notebook on your computer and click “File” and “Save a copy in Drive”.
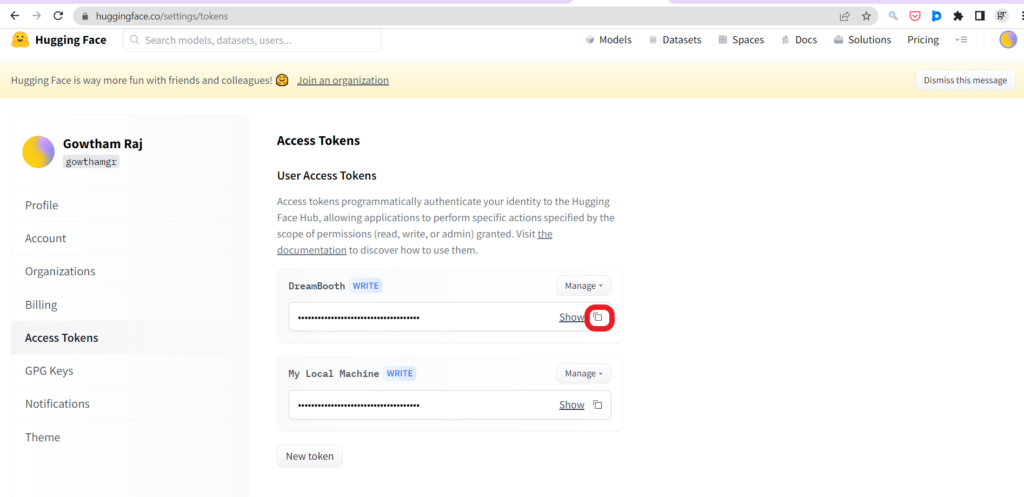
3. Get Access Token from Hugging Face
To use any of the Google Colab that is related to DreamBooth, you need to get the access token from Hugging Face.
Head to the Hugging Face website and sign up using your email address. Keep in mind that using your organization’s email address will help you to find your colleagues and join the team.
Then, go to “Settings” by clicking the “Profile icon”. Next, click “Access Token” and then, click “New Token” to create your access token.
While creating the token, you must select the role “Write”. You can name the token whatever you want, however, it is a good practice to give a name pertaining to the platform you are accessing from; in this case, the platform is Colab notebook.
Lastly, copy the token that you have created.
4. Run the Colab notebook
After opening the copied TheLastBen’s Colab notebook, click the Hugging Face link in the “Downloading the model” section to accept the terms. After accepting the terms, click “Access repository”.

Now, you will be able to see the field called “Huggingface_Token” under the “Downloading the model”.
Paste the token that you copied in Step 3.

Now, you need to run the cells one after the other. I.e. run the first cell and wait for the green tick to start the next cell.
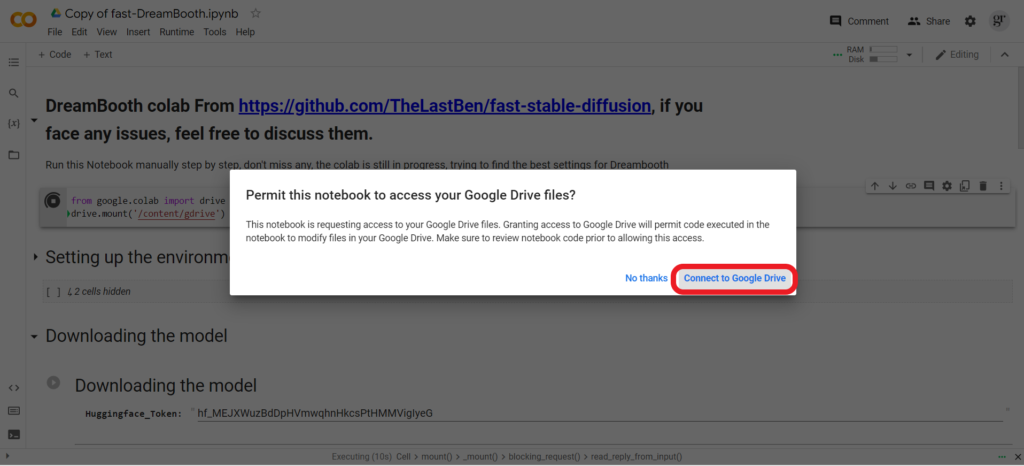
As soon as you run the 1st cell, you will get to see a permission request from Colab notebook to access your Google Drive files. Just, click “Connect to Google Drive”.
Before running the “Setting up” cell, make sure to enter the subject name, the instance name, and mention the number of images you are about to train/ upload.

Now start this cell. After starting this cell, you will be able to click the “Choose files” button. If you have a small number of images to be uploaded/ trained, click on the button.
If the number of images to be uploaded is large, just mention the URL of the folder in “Instance_DIR_Optional” field.
Leave the 7th cell which is optional.
Next, run the 8th cell, which is “Start DreamBooth” followed by running the last cell “Test the trained model”. The last cell would take 30 minutes to 90 minutes to complete.
5. Check the Output in Google Drive
Lastly, check for AI-generated images in your Google Drive.
Conclusion
There are three Colab notebooks available to use the DreamBooth X Stable Diffusion. Each one pretty much works the same. I have explained the fastest notebook in this article.
If you don’t want to spend time training the model with your photos or your favorite celebrity, you can use some of the pre-trained models from Hugging Face.
FAQs
1. What is .ckpt file in AI art generation?
The .ckpt file is a Checkpoint File that is generated by a code during the execution of training the machine. With the .CKPT file, anyone can run the trained model on their local machine or on the Colab notebook.
2. What I Can Do with Google’s DreamBooth?
- Create art from your face in a different context
- Tweak/ upscale the artworks created by other diffusion models
- It can mimic the particular artist’s style, change the view of the subject, do property modification like color change, make hybrids of animals, and include different accessories to the subject.
