
Midjourney Remix is an experimental feature that allows users to create different variations for their pre-generated Midjourney images without losing their similarity.
In this article, you will learn what remix is, how to use it, and which Midjourney model versions go well with remix mode.
The Remix feature of Midjourney allows you to make changes on the subject, completely change the subject, lighting of the image, add or remove any elements, and add or remove parameters. This can all be done by editing your prompt.
Table of Contents
How do I activate Remix mode in Midjourney?
The Remix feature in Midjourney is not active by default. You need to activate it manually by using two Midjourney commands. To activate Midjourney Remix mode, you can either use the “/prefer remix” command or “/settings” command.
If you are using the “/prefer remix” command, you need to use this same command for both enabling and disabling the remix mode.

If you are using the “/settings” command, you have the advantage of changing the Midjourney model versions along with the remix mode. Reuse this same command to disable the Remix mode.

How to Use the Midjourney Remix Mode
Once you have activated the Remix mode, you are all set to use it. Here are the steps to use Midjourney Remix mode.
- Activate Remix Mode
- Create a New Image or Load your Pre-created Image
- Click Anyone of Variations
- Edit and Execute the Prompt
1. Activate Remix Mode
As mentioned earlier, you need to activate the Remix mode since it is not active by default.
Activating the Remix mode is very simple. To do so, execute either the “/prefer remix” command or “/settings” command.
Now, you will be getting a notification saying that the Remix mode is activated.
2. Create a New Image or Load your Pre-Created Image
You can use the Remix feature of Midjourney either on your new creation or any of your pre-created images.
To create a new artwork, you need to use the “/imagine” command as usual and enter your prompt.

To load your pre-created images inside Discord, you need to use the “/show” command. To execute this command, you need the job_id of your pre-created image.
You can copy the Job_id of your artwork by going into the https://www.midjourney.com/app/. Then, hover over the image you want to use. Click “three dots”-> “Copy”->”Job ID”. Make sure you are logged in with the email address that you used for the Midjourney Discord login.

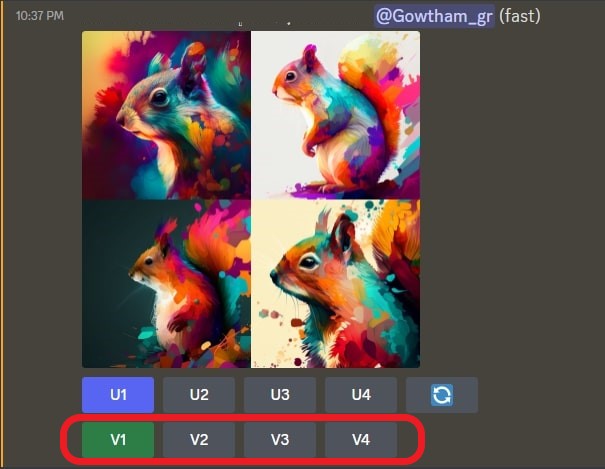
3. Click Anyone of Variations
To use Midjourney Remix feature on your freshly brewed artwork, just click any of the four variations (V) listed once you’ve performed the “/imagine” command.
If you want to use Remix on your pre-created images, click any of the four variations (V) listed once you’ve loaded them as shown in Step 2.
4. Edit and Execute the Prompt
Immediately after clicking any of the variations, you will get to see the “Remix Prompt” pop-up screen. There, you can start editing your prompt according to your needs.

Here is what you can do with the “Remix” feature:
- You can change or add any Midjourney parameters, such as –ar, –hd, –v1 to –v4, etc.
- Apart from parameters, you can add or remove any elements in your prompt
This is how you can activate and use the Remix mode in Midjourney.
Examples of Adding Elements with Midjourney Remix Mode
In the first example below, I tried adding the element of “sunglasses”. Take a look at both the input and output images.


You can see that I added the missing attribute “sunglasses” for the subject using the Remix mode. Midjourney nicely added the attribute without changing much of the image composition and style. This is the advantage of the “Midjourney Remix” command.
This time I’m going to add a Midjourney parameter to the same image that I created. To make this image look more like a portrait, I added the “–ar” parameter with 2:3, which is the perfect ratio for portraits.

There is not much to complain about in the result.
Now, you must have a better understanding of Remix command after seeing these examples. Let’s move on to removing elements using Midjourney Remix feature.
Example of Removing Elements with Midjourney Remix Mode
I used another Midjourney artwork for this example.
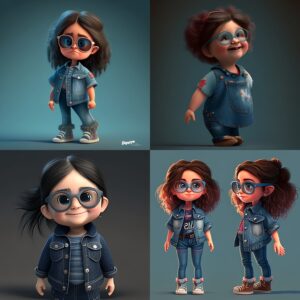
Let’s remove the sunglasses from our subject, the little girl.

Midjourney struggles when you try to remove any attributes using the Remix feature. I have tried multiple times even by changing the Midjourney versions, but most of them have anomalies.
Based on my experiment, Midjourney version 3 works well with Remix mode while removing elements. But, Midjourney version 3 has its own limitation of unclear fingers.
Hence, removing elements with Midjourney Remix mode needs to be optimized.
Conclusion
In a nutshell, Midjourney Remix feature allows you to go back and add elements that you have forgotten in your artwork.
But, removing elements with Remix mode is not up to par and needs to be improved.
To exit from the Remix mode, you need to execute either the “/settings” command or the “/prefer remix” command.
Bear in mind that the Midjourney Remix feature is an experimental one. Hence, it may be subject to change or removal.
FAQs
1. Difference between remix and remaster in Midjourney?
The Midjourney Remix mode allows you to make changes, such as adding new elements and changing existing elements, to your pre-created images without losing their similarity.
The Midjourney Remaster feature allows you to bring artistic and creative nature to your pre-existing image. It is actually a blend of –test and –creative parameters.
2. Can I remix other’s Midjourney creations?
Yes, you can Remix other’s Midjourney artwork as well. To do so, first activate the Remix mode using either the “/prefer remix” or “/settings” command. Then, click any variations of the image that you want to remix. By clicking on any one of the variations of the image, you will be able to edit the prompt and remix it.
3. Can I use the Remix command with all Midjourney parameters?
No, currently, you can only use a few Midjourney parameters that includes “– ar”, “– no”, “– stop”, “– tile”, and “– video” with the Remix command.

4. How do I upload and Remix images to Midjourney?
To upload and Remix multiple images, first, you need to activate the Remix mode using the “/prefer remix” or “/settings” command. Then, use the “/imagine” command to upload as many images as you want.

Next, click on any one of the four variations to edit the prompt and remix it.
