The safest way to hold cryptocurrencies is to use hardware wallets, also called “cold wallets.” Hackers cannot access cryptocurrencies stored in hardware wallets since they are offline.
In fact, all the cryptocurrencies are stored on the blockchain, not in your Ledger wallet. To access the cryptocurrency stored on the blockchain, you need a private key. The Ledger wallet securely stores that private key.
Ledger is one of the best hardware wallets and is used by over 4 million people. Currently, Ledger has two hardware wallets, the Ledger Nano X and Ledger Nano S Plus.
In this article, you will learn to set up Ledger Nano X properly.
Steps to Set Up Ledger Nano X
- Download Ledger Live
- Click “Set up a new Nano X”
- Connect your Nano X
- Choose PIN for your Nano X
- Backup and Confirm the Recovery Phrase
- Perform Genuine Check
- Install Crypto Application
1. Download Ledger Live
Ledger Live is the all-in-one application by Ledger, the company. Users can buy and manage cryptocurrencies, as well as manage NFTs, using it.
Ledger Live is the user interface for all Ledger devices, whether on your computer or mobile devices.

2. Click “Set up a new Nano X”
Once you have downloaded the Ledger Live application, open it and click “Get Started”.

Now, read the “Terms of service” and “Privacy policy” shown on your screen. Next, select the check box given and click “Enter Ledger app”.
Next, select your Ledger device.
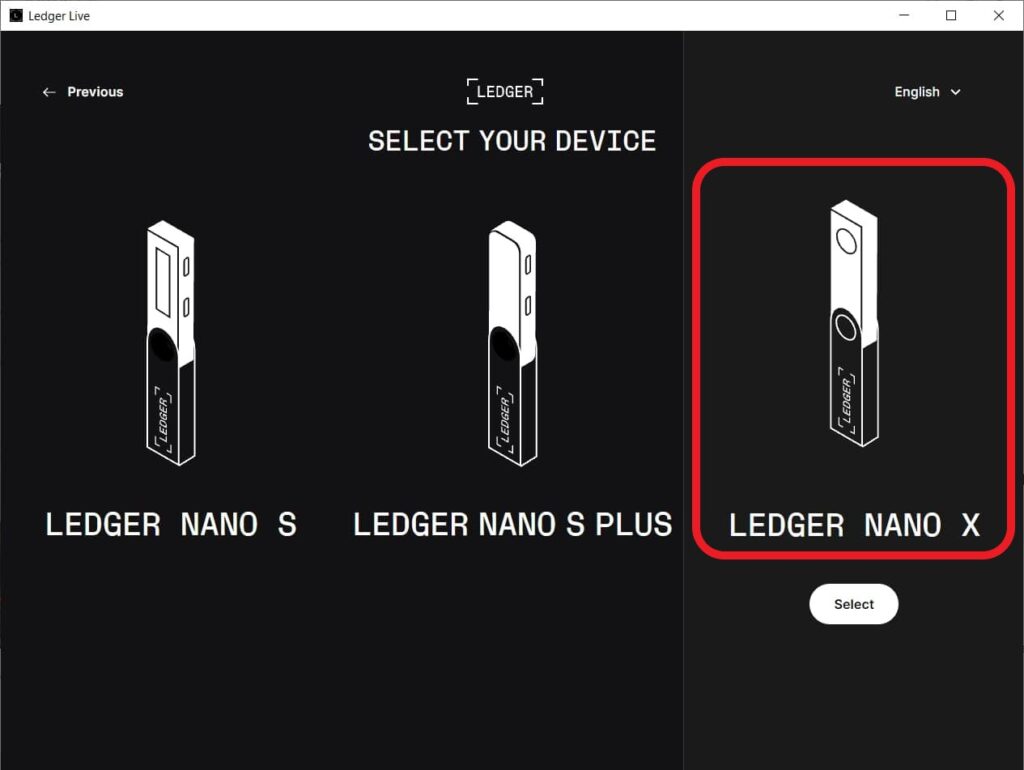
Then, you will be able to see two options: “Set up a new Nano X” and “Restore your recovery phrase on a new device”.
Click “Set up a new Nano X” since you haven’t set it up yet.

3. Connect your Nano X
After selecting the device, you will be able to see a few informational slides and a set of instructions for the set up process.
Read the instruction and click “OK, I’m ready!”.

It takes 30 minutes to set up the Ledger Nano X. Make sure to be alone during the setup process and have a pen to write the recovery phrase.
To connect your Nano X with the Ledge Live application,
- Turn on your Nano device and connect it to your computer with the USB cable provided. If you have an OTG cable, you can even connect the device to your smartphone.
- Just follow the on-screen instructions to interact with your Nano X device.
- Next, select “Set up as new device”. To validate the selection, you need to press both buttons on your device simultaneously.
4. Choose a PIN for your Nano X
Once you have connected your device and clicked “Set up as new device”, you will be able to see “Choose PIN with 4 to 8 digits”. Press the two buttons to select.
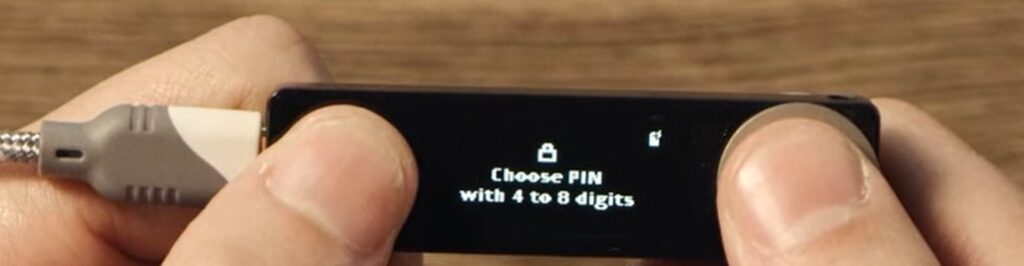
Now, you will be able to set the PIN. The PIN does not have to be 8 digits long, but it must be at least 4 digits long.
After setting the PIN, you need to confirm it again by re-entering the PIN.
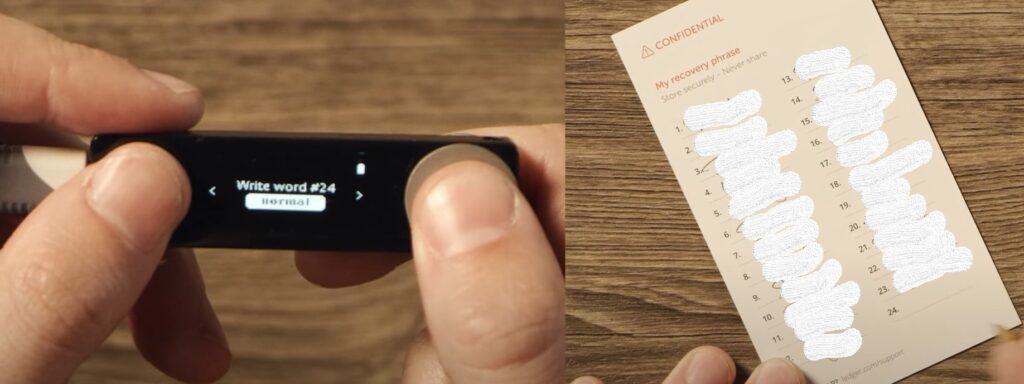
5. Backup and Confirm the Recovery Phrase
This is the most important step in setting up the Ledger wallets. After setting the PIN, you will be able to see your recovery phrase.
Recovery phrase of a wallet is the master key to that wallet, which gives access to that wallet account, the private key of that account, and the cryptocurrencies in it.
Every Web 3 wallet has a recovery phrase also known as a seed phrase. Each user of a Web 3 wallet will have a unique recovery phrase.
Ledger wallet provides each of its users with a unique 24-word recovery phrase and it does not keep a copy of it. Hence, make sure to save it securely. If you lose the recovery phrase, you will lose all of the cryptocurrencies stored in it.
Do not use screenshots, applications, or password managers to store the recovery phrase. Instead, store it in a physical format and keep it away from contact with others. And, most importantly, never share it with anyone.
A set of three recovery cards can be found on your Ledger device box. Make use of it to store your recovery phrase.
After taking the backup of your recovery phrase, you need to confirm it by selecting the words in the original order.
6. Perform Genuine Check
Head back to the Ledger Live application on your computer or smartphone.
Just go through the instructions it has been showing. At one point, you need to take a small quiz.
After that, there is just one step left to start using the Ledger Nano X, which is the genuine check. Click “Check my nano” in the Ledger Live application, and press both buttons on the device when it shows “Allow Ledger Manager”.
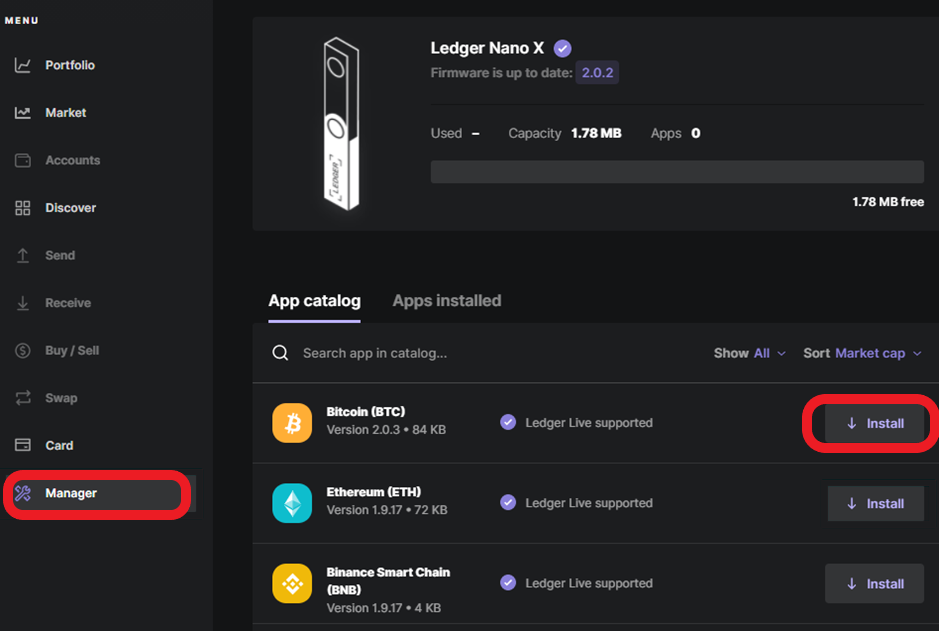
7. Install Crypto Application
To perform any cryptocurrency transfers or asset management, you need to manually install the cryptocurrency application on your device.
To do so, go to “Manager” in the Ledger Live application and install the app for your crypto asset.
That’s it; your Ledger Nano X device is ready to use.
Conclusion
Setting up the Ledger Nano X is a 30-minute process. It involves connecting the device to the Ledger Live application, setting up the new PIN for the device, and storing and confirming the recovery phrase.
Lastly, you need to perform a genuine check and install the crypto application, which you want to send, receive, or store.
