Transferring SOL from Crypto.com to Solflare wallet is such a painless task since the transferring fee of Crypto.com is very low. I.e. 0.005 SOL regardless of the amount of SOL sent.
To transfer SOL from Crypto.com to the Solflare wallet, you need your Solflare wallet address. Paste your Solflare wallet address on the Crypto.com ecosystem. Then, follow the on-screen instructions.
Apart from this, you need to install the Google Authenticator application on your mobile phone for verification purposes.
- Steps to Transfer Solana (SOL) from Crypto.com to Solflare Wallet
- Steps to Transfer Solana (SOL) from Crypto.com Mobile Application to Solflare Wallet
Steps to Transfer Solana (SOL) from Crypto.com to Solflare Wallet
- Navigate to the Spot wallet
- Select the crypto asset
- Click Withdraw
- Click on Review Withdrawal
- Enter the verification code
- Check your Solflare wallet
1. Navigate to the Spot wallet
Go to the Crypto.com website and log in to your account.
Now, you will be in your Crypto.com account dashboard.
On the left side menu, you can see Wallets. Click on it.
Then, you need to click Spot.

2. Select the crypto asset
After clicking the Spot, you will be able to see the assets that you have bought on Crypto.com.
Find SOL.
You can use the search box if you want to.

3. Click Withdraw
Once you have found your SOL, click on Withdraw.
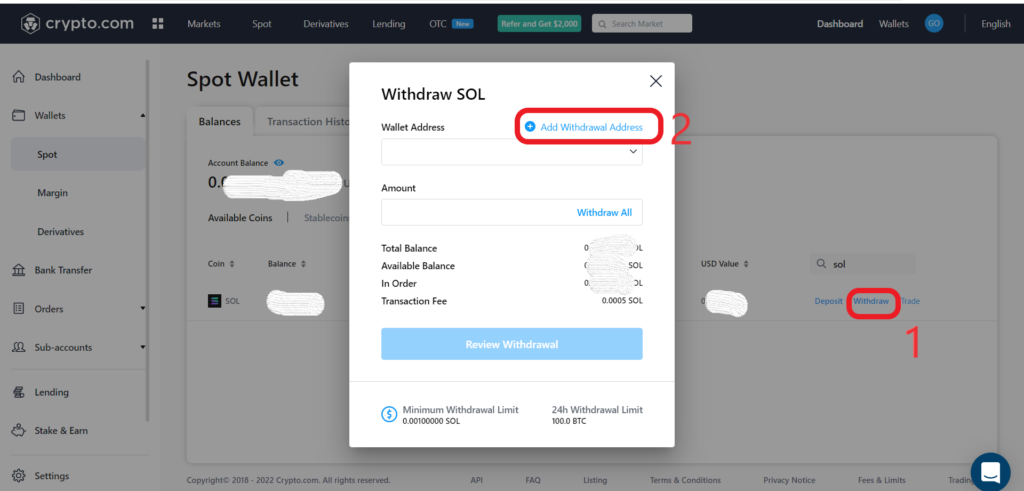
Clicking Withdraw will bring up the Withdraw SOL window.
Since this is your first time transferring SOL, you need to add the destination wallet address manually.
Then only you can view that address in the Wallet Address field drop-down.
To add the Solflare wallet address into the Crypto.com ecosystem,
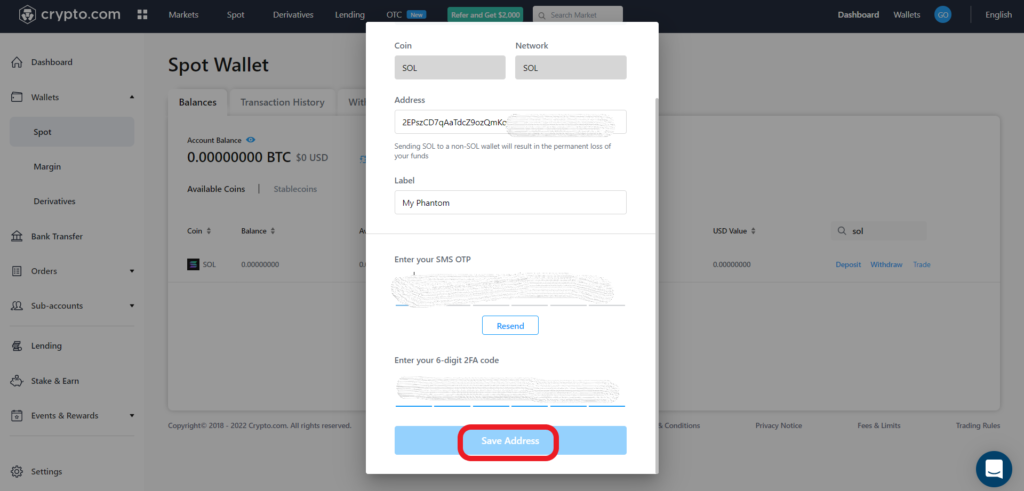
- Click on Add withdrawal Address
- Copy-paste your Solflare wallet address in the Address field
- Give a name in the Label field. For ex: My Solflare wallet
- Fill in the OTP received in your mobile
- Fill in the 6-digit 2FA code received in your Google Authenticator application
- Finally, click on Save Address.
To copy your Solflare wallet address,
- Launch your Solflare wallet
- Click on Receive
- Click on COPY ADDRESS

Enter the amount of SOL that you want to send.
If you would like to send all your SOL on Crypto.com, click Withdraw All.
4. Click on Review Withdrawal
Once you have added the address and the withdrawal amount, click on Review Withdrawal.
A confirmation window will appear.
Go through your order detail and click on Confirm.
5. Enter the verification code
After clicking the Confirm, there will be a two-factor authentication check-up.
Now, open your Google Authenticator application and read the 6-digit code.
Enter your 6-digit code back in your Crypto.com to proceed further.
6. Check your Solflare wallet
You will receive a transaction notification on Crypto.com once you enter the verification code.
Now, you can head back to your Solflare wallet and check your balance.
Usually, your SOL will get reflected in a few seconds.
That’s all. You have successfully transferred your SOL from Crypto.com to Solflare wallet.
Steps to Transfer Solana (SOL) from Crypto.com Mobile Application to Solflare Wallet
- Tap on Accounts
- Choose your crypto asset
- Tap on Transfer
- Tap on External wallet
- Tap Withdraw SOL
- Tap Confirm
- Enter the verification code
- Check your Solflare wallet
1. Tap on Accounts
Open your Crypto.com application on your mobile phone.
Tap on Accounts.

2. Choose your crypto asset
Now, you can see Crypto Wallet.
Under the Crypto Wallet, you can see your crypto assets purchased.
Tap on SOL.
3. Tap on Transfer
After you tap on SOL, you will see three options just above the graph:
Buy SOL, Sell SOL, and Transfer.
Tap on Transfer.
4. Tap on External Wallet
Once you have tapped Transfer, you can see two options: Deposit and Withdraw.
Tap on Withdraw.
Then, tap External Wallet.

Upon tapping on the External Wallet, you can see Withdrawal Whitelist.
Every time you send to a new wallet address, you need to add that address priorly.
Then only you can see that address in the Withdrawal Whitelist.
To add a new address, tap on the plus symbol on the top right corner of your mobile screen.
Then, tap on Wallet Address.

Now, copy-paste your Solflare wallet address on the SOL Wallet Address field.
Then, give any name in the Wallet Name field.
Tap on Continue.
Now, you must be able to see your Solflare wallet address in the Withdrawal Whitelist.
To copy your Solflare wallet address,
- Launch your Solflare wallet
- Click on Receive
- Click on COPY ADDRESS
5. Tap Withdraw SOL
Now, you need to tap on Withdraw SOL besides your Solflare wallet address.
Enter the amount of SOL that needs to be sent.
Tap on Withdraw.
6. Tap Confirm
A confirmation window will appear.
Go through your order detail and click on Confirm.
7. Enter the verification code
Now, there will be a two-factor authentication check-up.
Now, open your Google Authenticator application and read the 6-digit code.
Enter your 6-digit code back in your Crypto.com to proceed further.
8. Check your Solflare wallet
You will receive a transaction notification on Crypto.com once you enter the verification code.
Now, you can head back to your Solflare wallet and check your balance.
Usually, your SOL will get reflected in a few seconds.
That’s all. You have successfully transferred your SOL from Crypto.com application to Solflare wallet.