To transfer Dai (DAI) from Binance to Coinbase, first, you need to copy the DAI deposit address in Coinbase.
Then, head to your Binance account and find DAI.
Select “Withdraw” paste the DAI deposit address and enter the amount.
Lastly, complete the verification process.
The withdrawal processing from Binance to Coinbase typically takes 2 to 15 minutes to complete. However, it can take longer if the network is congested.
To transfer Dai (DAI) from Binance to Coinbase, there will be a 0.8 ~ 10 DAI withdrawal fee applicable. The fee can vary depending upon the network congestion and/ or the type of Network you choose.
- Steps to Transfer Dai (DAI) from Binance to Coinbase
- Steps to Transfer Dai (DAI) from Binance Mobile Application to Coinbase Mobile Application
Steps to Transfer Dai (DAI) from Binance to Coinbase
- Click “Send/ Receive” in Coinbase
- Copy the DAI Deposit Address
- Go to Fiat and Spot in Binance
- Find DAI
- Paste the DAI Address and Enter the Amount
- Enter the Verification Code
- Check in Binance and Coinbase
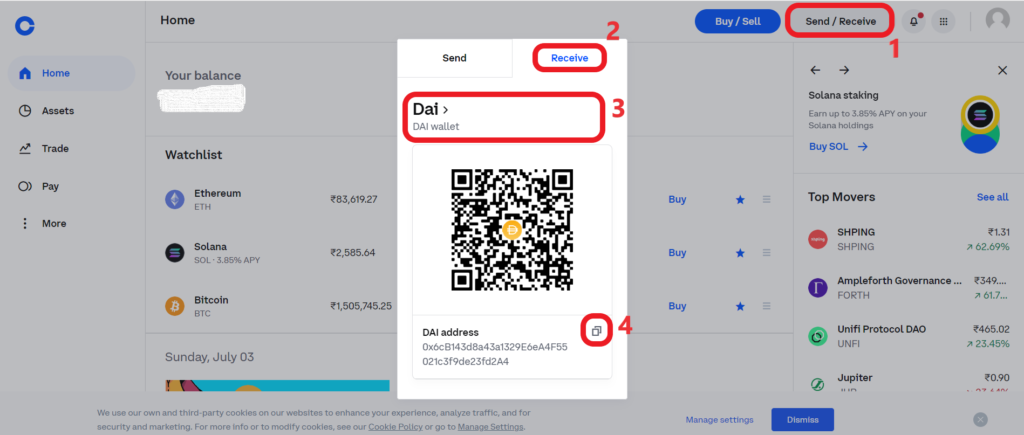
1. Click Send/ Receive in Coinbase
Sign in to your Coinbase account.
Click “Send/ Receive” in the upper right corner of the webpage.
Navigate to the Receive tab.
2. Copy the DAI Deposit Address
To copy the DAI deposit address, first you need to select it.
Click on the “Asset” field and select the cryptocurrency that you wish to send.
You can use the search tab to locate DAI.
Once you have found DAI, tap on it.
Then, click the copy icon to copy the address.
3. Go to Fiat and Spot in Binance
Log in to your Binance account.
Click “Wallet” in the top right corner of the webpage.
Then, click “Fiat and Spot” or “Funding Wallet”.
If you have bought DAI via fiat currency/ spot trade, you need to click “Fiat and Spot”.
If you have bought DAI via P2P trade, you need to click “Funding Wallet”.

4. Find DAI
Once you have clicked “Fiat and Spot” or “Funding Wallet”, you can see a search box.
Use the search box to find DAI.
Once you have found DAI, click on “Withdraw”.

5. Paste the DAI Address and Enter the Amount
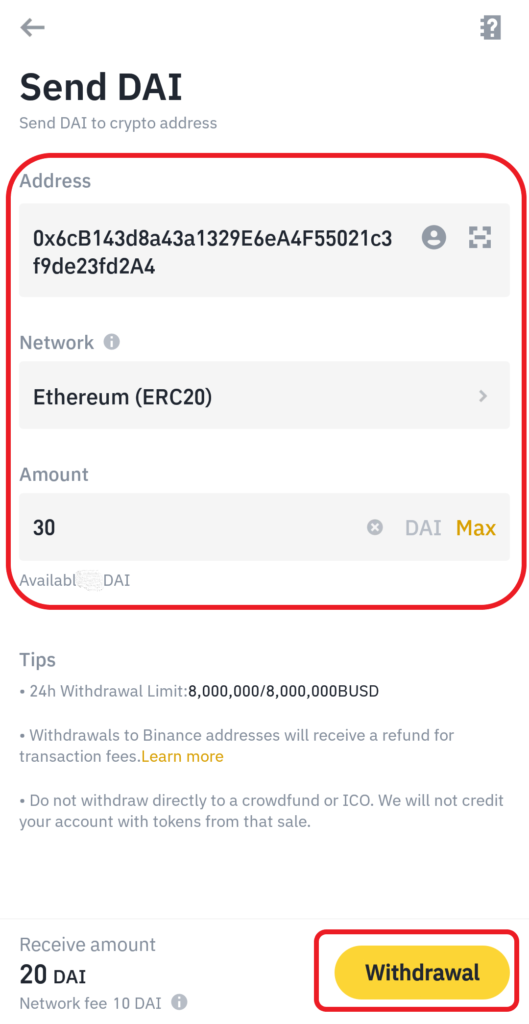
Upon clicking on “Withdraw”, you will land on the Withdrawal window.
There you need to paste the DAI address that you have copied in Step 1.
After pasting the DAI address on the Address field, you need to select Network as Ethereum ERC20. Because Coinbase supports DAI transactions over Ethereum ERC20 Network only.
Then, you need to fill in the withdrawal amount in DAI.
If you want to send all of your DAI to your Coinbase account, click MAX.
Lastly, click “Withdraw”.

Note: You need to transfer a minimum of 30 DAI.
After clicking Withdraw, a confirmation pop-up will appear.
Check the address again and the network and click “Continue”.
6. Enter the Verification Code
A security check page will appear after clicking “Continue”.
To complete the transfer, you must enter the OTP you received by email and mobile.
Just after completing the security confirmation, you will see a Withdrawal Request Submitted pop-up.
Click “Complete”.
That’s it. You have successfully sent Dai (DAI) from Binance to Coinbase.
7. Check in Binance and Coinbase
Once you have got the Withdrawal Request Submitted notification, you can go ahead and check in the Recent Withdrawals section of your Binance account.
To reach the Recent Withdrawals section, just scroll down on the Withdrawal window page.

You can also head back to your Coinbase account and check the DAI recent transactions by clicking on DAI under Assets.
For us, it took 10 minutes to receive the DAI on our Coinbase account.
Steps to Transfer Dai (DAI) from Binance Mobile Application to Coinbase Mobile Application
- Copy the DAI Deposit Address in Coinbase Application
- Select DAI in Binance Application
- Paste the DAI Address and Enter the Amount
- Enter the Verification Code
- Check in Binance and Coinbase
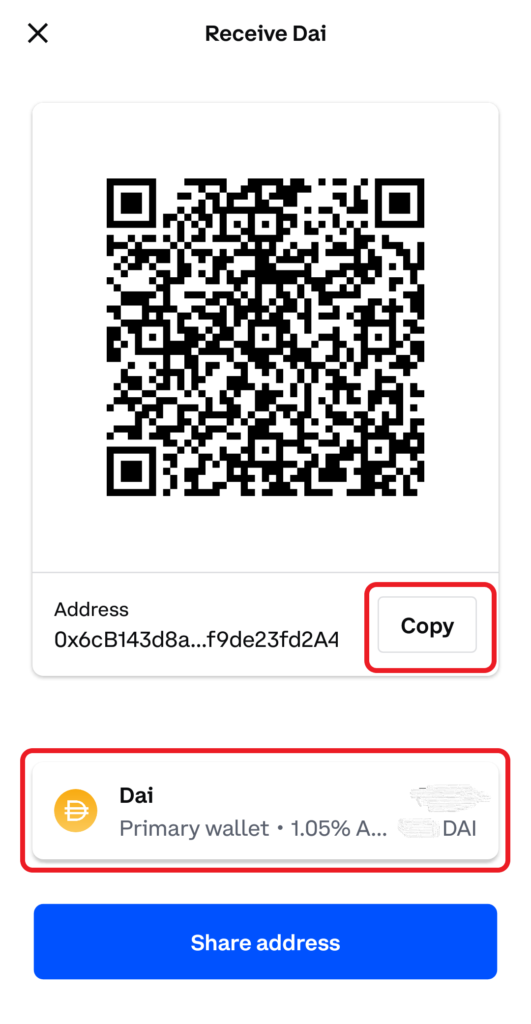
1. Copy the DAI Deposit Address in Coinbase Application
Launch the Coinbase application.
Now, you will be able to see multiple options, such as Buy, Sell, Send, Convert, and Receive.
Tap on “Receive”.

Upon tapping on “Receive”, a receive window will appear. There you can select the crypto asset to see the deposit address.
By default, Bitcoin would be selected. Tap on it to change the asset as Dai (DAI).
Then, just tap on “Copy”.
2. Select DAI in Binance Application
Launch the Binance mobile application.
Tap on the “Wallet” icon.
Now, you will be able to see your crypto assets.
Navigate to DAI and tap on it. You can make use of the search box to search DAI.

3. Paste the DAI Address and Enter the Amount
After tapping on DAI, you will be able to see two options: Deposit and Withdrawal.
Tap on “Withdrawal”.
Now, you need to paste the DAI address that you have copied in Step 1.
After pasting the DAI address, you need to select the Network as Ethereum ERC20.
Then, fill in the amount in DAI.
If you want to send all of your DAI to Coinbase, tap on “MAX”.
Lastly, tap on “Withdrawal”.
Note: You need to transfer a minimum of 30 DAI.
4. Enter the Verification Code
Next, you need to authenticate the transfer.
Type in the verification codes received in your e-mail and phone and tap on “Submit”.
That’s it. You have successfully sent Dai (DAI) from Binance mobile application to Coinbase mobile application.
5. Check in Binance and Coinbase
Go back and tap on “Dai (DAI)” under Assets to see the recent transfers.
You can also go to your Coinbase account and tap on “Dai (DAI)” under Assets to see the recent transfers.
Conclusion
To send Dai (DAI) from Binance to Coinbase, you need to select the DAI deposit address and the right network.
As you are transferring exchange to exchange, you need to be careful when selecting the Network. Select the Network that is supported by both exchanges.
Any incorrect address or wrong choice of the network will result in the permanent loss of crypto assets.
