To transfer Solana (SOL) from Solflare Wallet to Gate.io, you need to copy the Gate.io SOL deposit address.
Then, Open the Solflare Wallet and click “Send”.
Next, enter the amount of SOL to be transferred and paste the address copied.
Lastly, review the details and click “Send” again.
It takes 1-5 minutes to transfer SOL from Solflare Wallet to Gate.io.
To transfer Solana (SOL) from Solflare Wallet to Gate.io, a network fee of ~0.000005 SOL is applicable.
- Steps to Transfer Solana (SOL) from Solflare Wallet to Gate.io
- Steps to Transfer Solana (SOL) from Solflare Wallet Mobile Application to Gate.io Mobile Application
Steps to Transfer Solana (SOL) from Solflare Wallet to Gate.io
- Copy SOL Deposit Address in Gate.io
- Click “Send” in Solflare Wallet
- Enter the Amount and Recipient Address
- Click “Confirm”
- Check Recent Transfers
1. Copy SOL Deposit Address in Gate.io
Log in to your Gate.io account either by entering your credentials or scanning the QR code displayed on the website from Gate.io mobile application.
Then, hover over the “Wallet” in the upper right corner of the webpage.
Now, you will be able to see a few options.
Click “Funds Overview”.
Then, click “Deposit” since you are depositing Solana (SOL) in the Gate.io exchange.

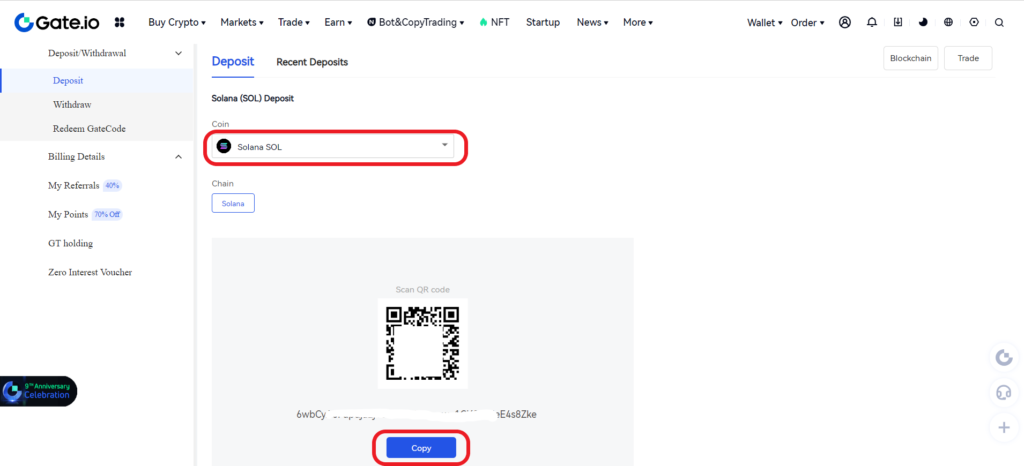
To copy the SOL deposit address, first, you need to select Solana (SOL).
You can select Solana (SOL) by clicking the “Coin” dropdown box.
Once you have found Solana (SOL), click on it.
Now, click “Copy” or scan the QR code to capture the address.
2. Click “Send” in Solflare Wallet
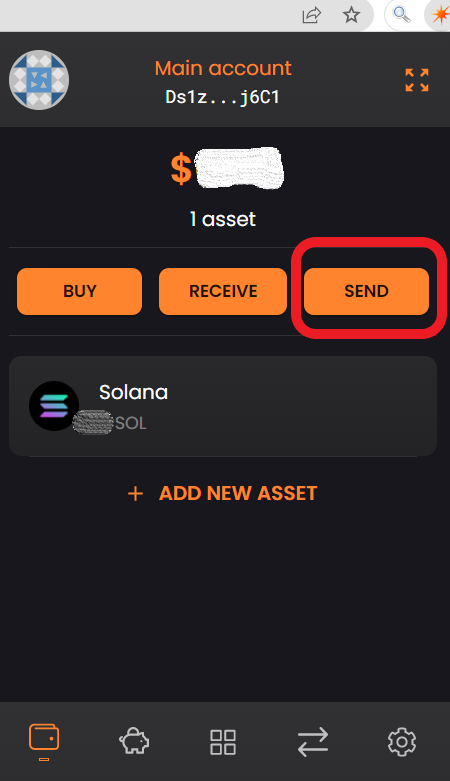
Open the Solflare Wallet extension and enter the password to unlock it.
Now, you will be able to see Buy, Receive, and Send.
Since you are sending SOL from Solflare Wallet to Gate.io, click “Send”.
3. Enter the Amount and Recipient Address
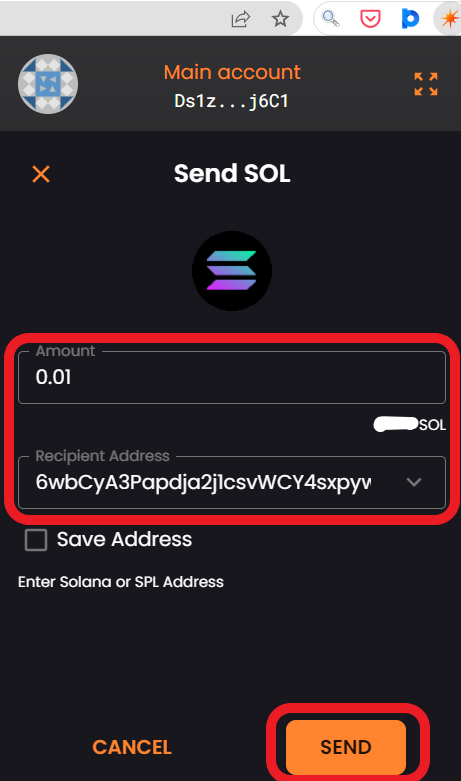
After clicking Send, you will land on the Send SOL page.
Here, you need to enter the amount of SOL that you wish to send to the Gate.io account.
Next, paste the SOL deposit address that you copied in Step 1.
If you want to save this address, select the “Save Address” checkbox.
Lastly, click “Send”.
4. Click “Confirm”
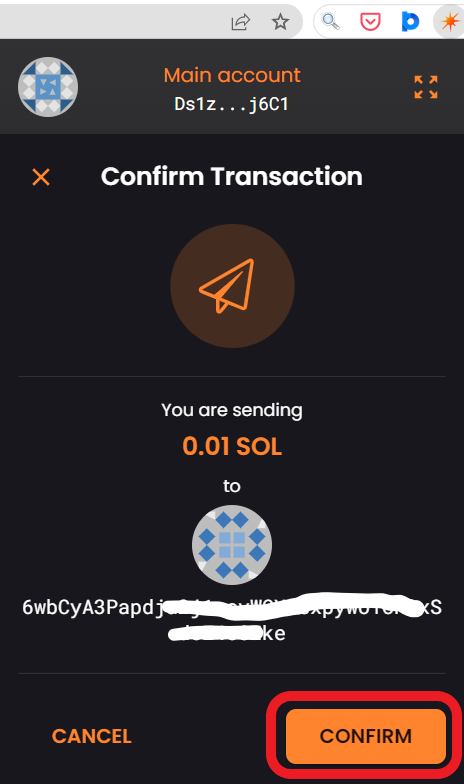
After clicking Send, you will get to see the “Confirm Transaction” page.
This page contains the transfer amount, To address, and fee.
Review the details and click “Confirm”.
That’s all. You have successfully transferred SOL from the Solflare wallet to Gate.io.
5. Check Recent Transfers
Now, you need to click on Solana (SOL) on the front page of your Solflare wallet extension to check the recent transfers.
To check the recent deposits in Gate.io, scroll a bit down on the “Deposit” page.

Steps to Transfer Solana (SOL) from Solflare Wallet Mobile Application to Gate.io Mobile Application
- Copy SOL Deposit Address in Gate.io
- Tap on “Send” in Solflare Wallet Application
- Paste the SOL Deposit Address and Enter the Amount
- Confirm Transaction
- Check Solflare Wallet and Gate.io
1. Copy SOL Deposit Address in Gate.io
Open the Gate.io mobile application.
Tap on “Wallets” at the bottom of the mobile screen.
Then, tap on “Deposit”.
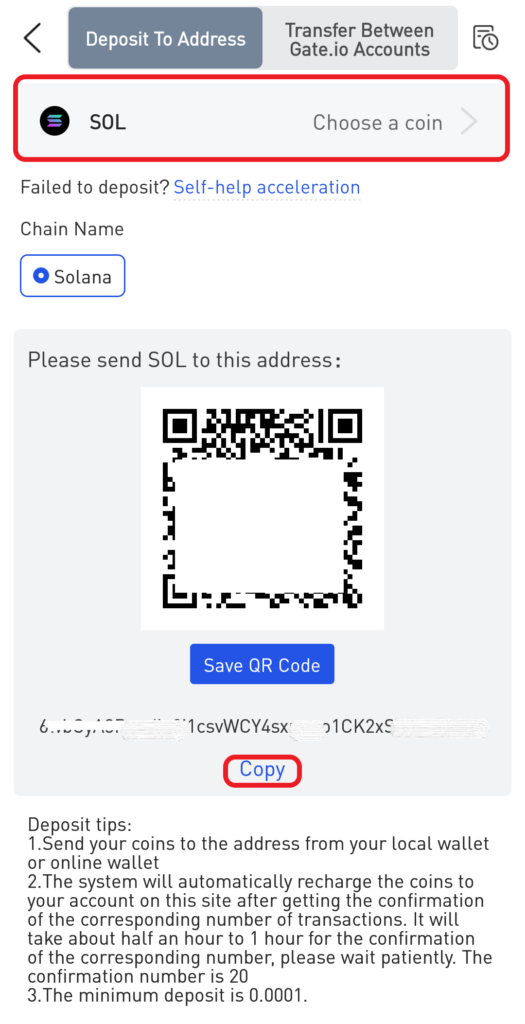
Next, you need to find Solana (SOL) using the search box and tap on it.
Now, you could see the SOL deposit address.
Tap on “Copy” or scan the QR code.
2. Tap on “Send” in Solflare Wallet Application
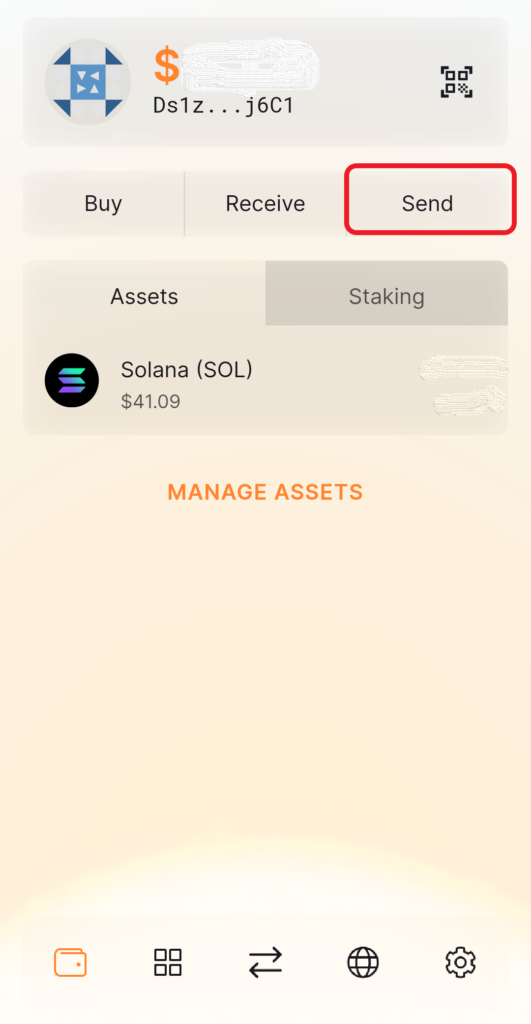
Launch the Solflare mobile application.
Now, you will be able to see three options: Buy, Receive, and Send on the dashboard.
Tap on “Send”.
3. Paste the SOL Deposit Address and Enter the Amount
Once you tap on Send, the Send Solana (SOL) window will appear.
You need to enter the amount of SOL that you wish to send to the Gate.io account.
Next, paste the SOL deposit address that you have copied in Step 1.
Lastly, tap on “Send”.

4. Confirm Transaction
After tapping on Send, you will land on the confirmation page.
On this page, you can see the To address, the amount to be transferred, and the network fee.
Once you have reviewed these details, you need to “Swipe to confirm”.

5. Check Solflare Wallet and Gate.io
Now, you can check the recent transfers by tapping on the SOL on the front page of your Solflare Wallet application. Then, tap on the “Activity” tab.

You can also view the recent transactions on the Gate.io application.
To do so, tap on the “recent transaction icon” in the upper right corner of the Deposit page.

Conclusion
To send Solana (SOL) from Solflare wallet to Gate.io, you need the recipient’s SOL address.
Make sure that you copy the right address as it is the crucial factor involved in the transfer process.
An incorrect address or wrong network selection will result in the permanent loss of the crypto asset.