Stable Diffusion (SD) AI art generator is rapidly growing compared to other text-to-image AI art generators out there. There are countless models built as well as being built on Stable Diffusion.
For example, Stable Diffusion X DreamBooth turns yourself into an AI art.
Stable Diffusion in Canva and Photoshop
The wide range of adaptability of SD has led to the creation of its extensions in Canva and Photoshop. Yes, now people can use Stable Diffusion inside Canva and Photoshop.
Canva
Canva is the most popular free-to-use graphic design platform to create social media graphics, presentations, posters, PDF documents, blog featured posts, and other visual content.
Canva is widely adapted by people due to its easy-to-use interface. It has many features and built-in extensions, such as:
- Pexels and Pixabay for free stock images
- Pixton and Character Builder for free avatars
- Branfetch for free brand logos
- Bitmoji and Emoji for free emojis
- GIPHY for free gifs
- Iconduck for free icons and emojis
- Stipop for free stickers
- Platforms for importing content, such as Instagram, Meta, Dropbox, and more
Now, they added the Stable Diffusion extension to this list. Hereafter, users of Canva can access SD inside the platform.
How to Use Stable Diffusion in Canva
- Log in to your Canva account.
- On the left-hand side, you can see multiple options that include Template, Elements, Uploads, etc. Scroll down to reach the option “More”.
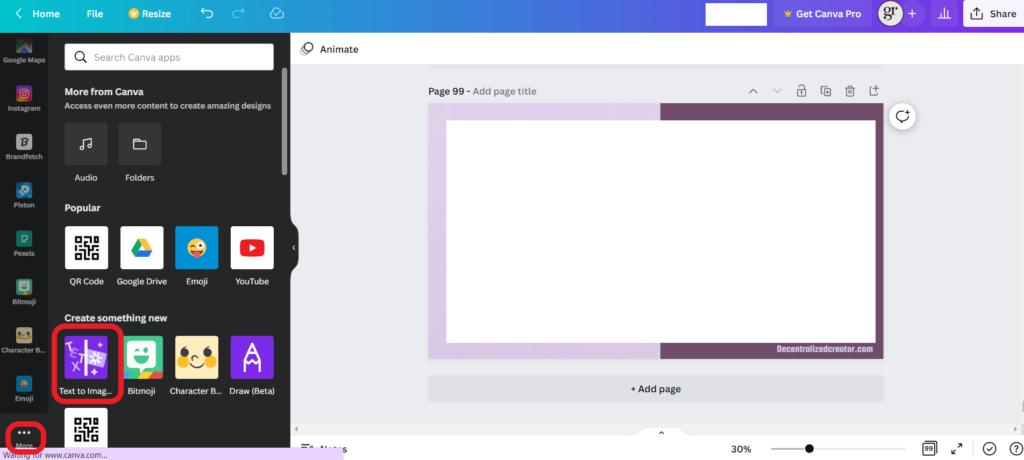
- Click “More”. Now, you will be able to see “Text to Image” under “Create something new”. Voila! You have found Stable Diffusion. Just click on “Text to Image”.
- After clicking on “Text to Image”, you will be able to see the description box. Type any text describing your needs. The text description you are about to give is known as a “Prompt”. To get good results, you need to write good prompts.
- Then, you need to choose the given “style”. Lastly, click “Generate image”.
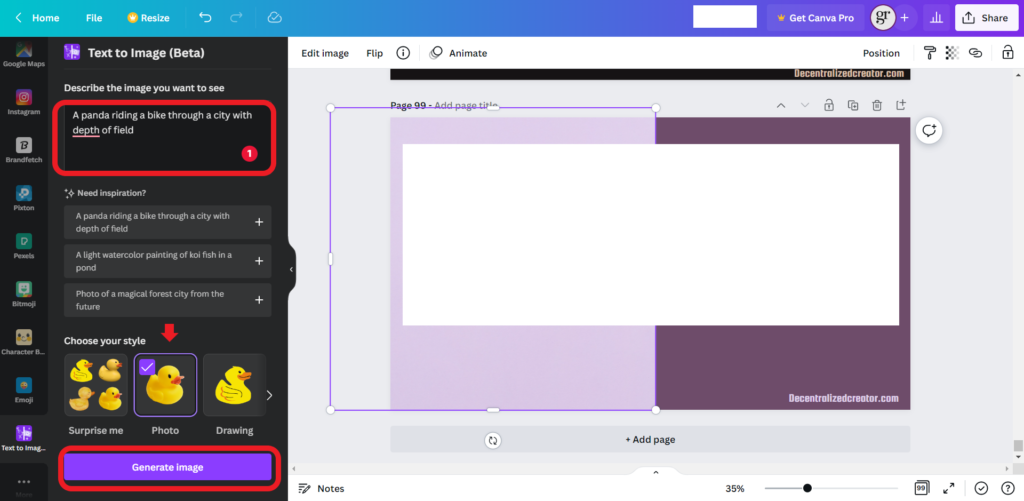
- Within 60 seconds, you will get two AI art as the output for your prompt. Click on it to add it to your design.
Photoshop
Photoshop supports many useful plug-ins. One amongst them is the Stable Diffusion text-to-image art generator.
With SD in Photoshop, you can generate images by giving text descriptions known as “prompts” in under 60 seconds. Then, you can edit that image according to your requirement using Photoshop.
Download and Install Stable Diffusion in Photoshop
- Download and install the Stable Diffuson plug-in. It is available on Christian Cantrell’s website as well as in Adobe Exchange.
If you have downloaded the plug-in from the Christian Cantrell website, follow the below steps to install it:
- Make sure to run the Creative Cloud and ensure that the Creative Cloud and Photoshop are up-to-date with the latest version.
- After downloading the plug-in, open the Photoshop application.
- Then, double-click on the CCX file that you have downloaded.
- Now, you will be able to see the plug-in panel. If not, go to Plugins > Stable Diffusion.
How to Use Stable Diffusion in Photoshop
- After the download and installation of the Stable Diffusion plug-in, you need to paste the API key from DreamStudio. For those who don’t know what DreamStudio is, it is nothing but an in-browser interface for Stable Diffusion.
- To copy the API key, you need to go to the DreamStudio website and sign in with your Gmail account or Discord account. Use your Discord account to sign in to get free generations.
- Then, click the “Profile icon” in the upper right corner of the webpage. Next, click “Membership”.
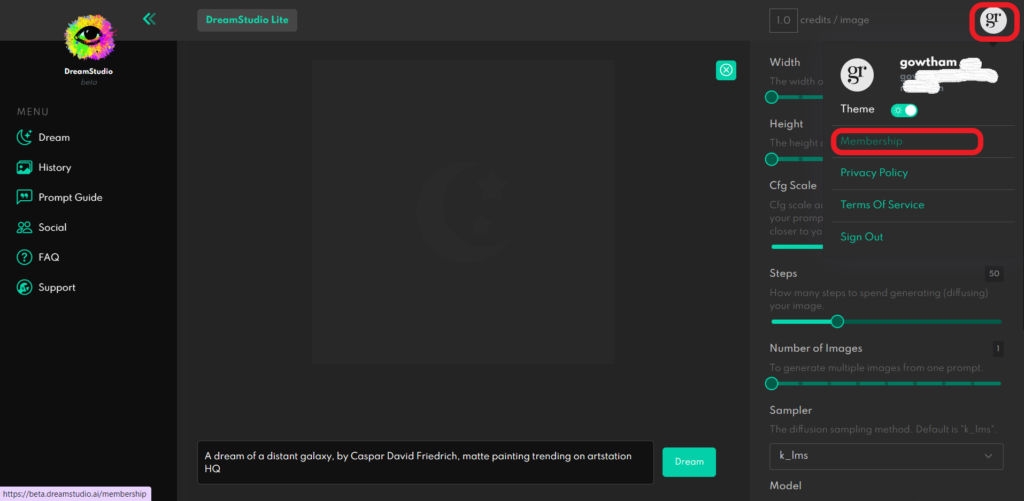
- Navigate to the “API Key” tab and click “Copy”. Note: You need to buy the membership if you run out of free generations. And, it will cost only $10 for 1k generations.

- Now, paste the key in the SD plug-in under “API Key” and click “Save”.
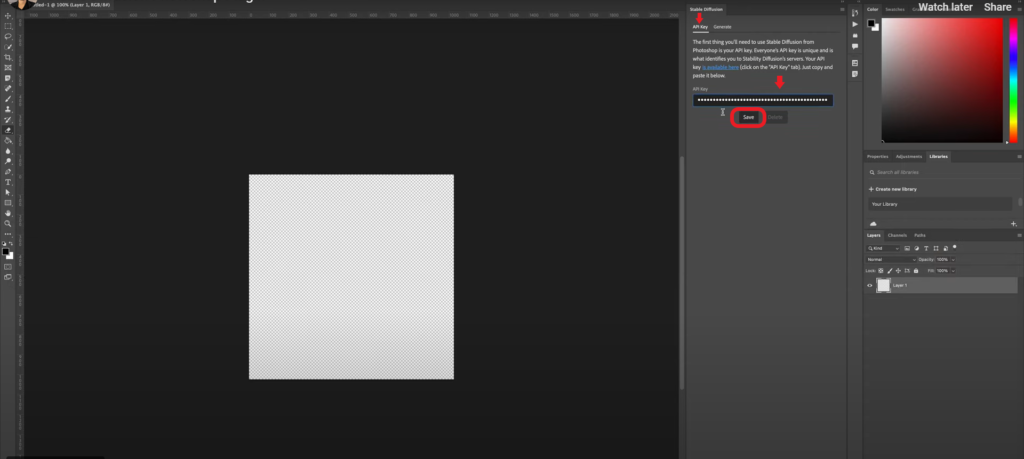
- Next, navigate to the “Generate” tab in the plug-in and enter the prompt in the given prompt box. Leave the width and height as it is for better quality.
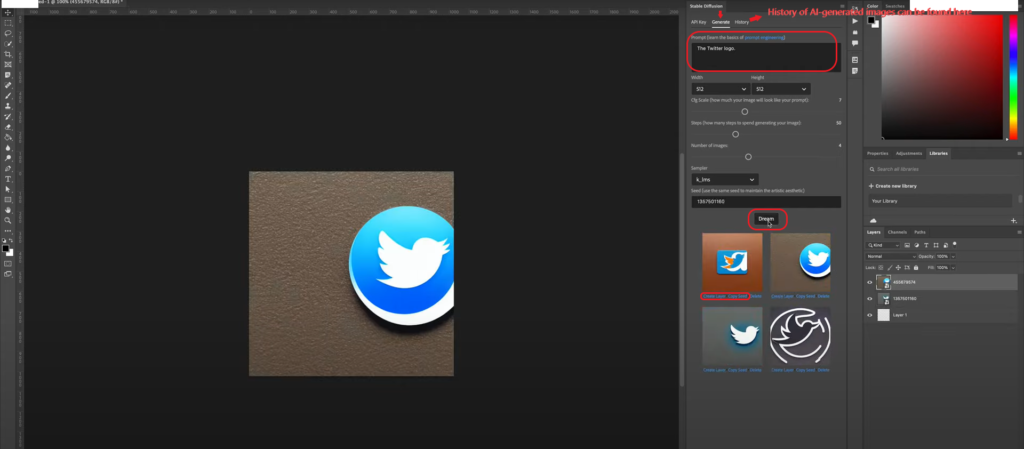
- Then, you can adjust the sliders for how many steps to spend generating your image and the number of output images if you want.
- Lastly, click “Dream” to get the images.
- To use the AI-generated image in Photoshop, you need to click “Create Layer”. To regenerate a particular image for more variations, click “Copy Seed” and click “Dream” again.
- Click the “History” tab to see the AI-generated images of all time.
Conclusion
Stable Diffusion plug-in in Canva and Photoshop is a boon for artists and graphic designers as it saves a lot of time for them. While there is no installation needed for Canva, Photoshop requires manual installation of the SD plug-in.
