Solflare now allows its users to access and manage centralized finance (CeFi) and decentralized finance (DeFi) accounts on its platform with recent FTX integration.
Solflare users now connect their FTX.Com and FTX.US accounts to their Solflare Wallet accounts.
In order to provide users with a seamless experience, Web2 and Web3 have been combined under a single roof.
The Perks of FTX Integration with Solflare
- Reflection of FTX account balance in Solflare UI
- Any Solana Program Library (SPL) tokens on FTX account will appear in Solflare Wallet
- Easy transferring of funds between FTX and Solflare instantly
- Easier swapping
- Enhanced Solana dApps experience with FTX ecosystem
- Less fee: You only need to pay network fee not any withdrawal fee
To experience the perks of FTX integration with Solflare, you must connect your FTX account with Solflare Wallet.
In this article, you will learn to connect FTX account to Solflare Wallet and transfer crypto instantly.
How to Connect FTX to Solflare Wallet
To connect FTX account to Solflare, you need to click on the “Profile Icon” in the upper left corner of the Solflare Wallet extension.
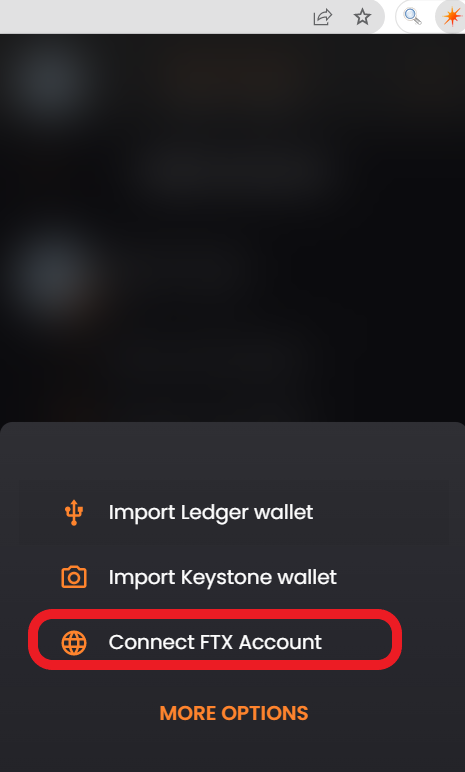
Then, click “Import a new Wallet” followed by clicking “Connect FTX Account”.
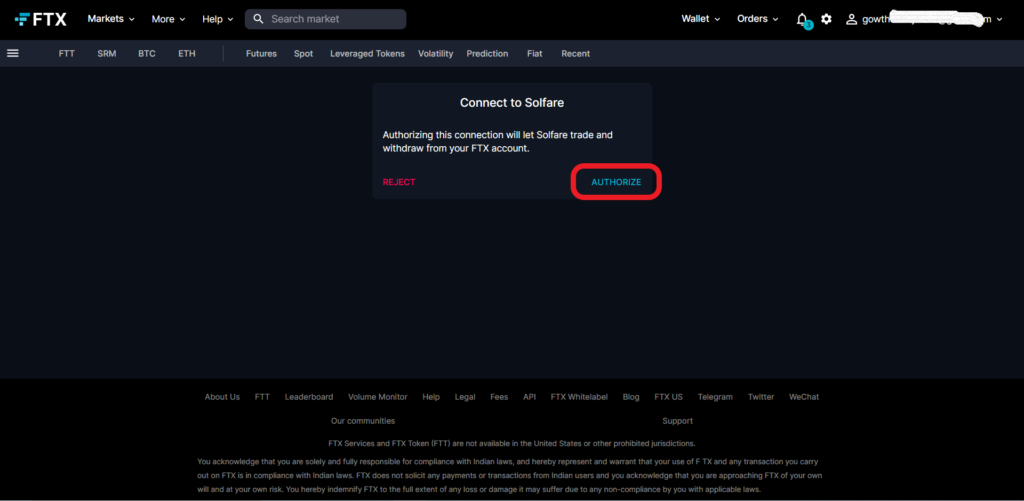
Login to the FTX account and authorize the connection.
Remember, you cannot your FTX account to Solflare if you did not complete the FTX KYC verification process.
Once you have established the connection, you can manage the FTX and Solflare Wallet account balances under a single roof.
Also, you can experience the instant transfer of crypto between FTX and Solflare with almost zero fees.
Steps to Connect FTX to Solflare Wallet
- Install Solflare Wallet
- Click on “Import a new wallet”
- Click “Connect FTX Account”
- Authorize the Connection
- Transfer Funds Between FTX and Solflare
1. Install Solflare Wallet
If you have already installed Solflare Wallet, you can skip this step.
Solflare is one of the native Solana wallets on the Solana blockchain.
Solflare Wallet allows users to send, receive, and store SPL tokens. It also acts as a gateway to access Solana dApps.
The first step is to download Solflare Wallet.
After downloading Solflare, you need to create and set up your account.
The account setup process includes creating a password and storing your 12/24 word recovery phrase.
2. Click on “Import a new wallet”
Open the Solflare Wallet Extension and enter the password to unlock it.
Now, you will land on the dashboard of your Solflare account.
You need to click on the “Profile icon” in the top left corner of the wallet extension.
Upon clicking the Profile icon, you can see two options: Add a new account and Import a new wallet.
Click “Import a new wallet”.

3. Click “Connect FTX Account”
After clicking Import a new wallet, you will be able to see three options: Import Ledger Wallet, Import Keystone Wallet, and Connect FTX Account.
You must know what to click on. Click “Connect FTX Account”.

Solflare supports both the ftx.com and ftx.us accounts. Select which one you want to connect with.

4. Authorize the Connection
After selecting either the International or United States FTX account, you need to enter the credentials to log in.
You can even log in with Gmail or Apple accounts.
After the successful login to your FTX account, a “Connect to Solflare” pop-up will appear.
This is nothing but asking for authorization. By authorizing this connection, you will let Solflare trade and withdraw from your FTX account.
Click “AUTHORIZE”.

Next, if you have any sub FTX account, you can also select that and import it.
Otherwise, just click “Continue”.

That’s it. You have successfully connected your FTX account to Solflare Wallet.
To switch between the FTX and Solflare accounts, you need to click on the “Profile icon”.
5. Transfer Funds Between FTX and Solflare
After establishing the connection between Solflare and FTX accounts, you are all set to transfer funds instantly whenever you need to.
To transfer crypto from FTX to Solflare instantly, you need to switch to the FTX account in your Solflare Wallet by clicking the “Profile Icon”.
Then, click “Send”.

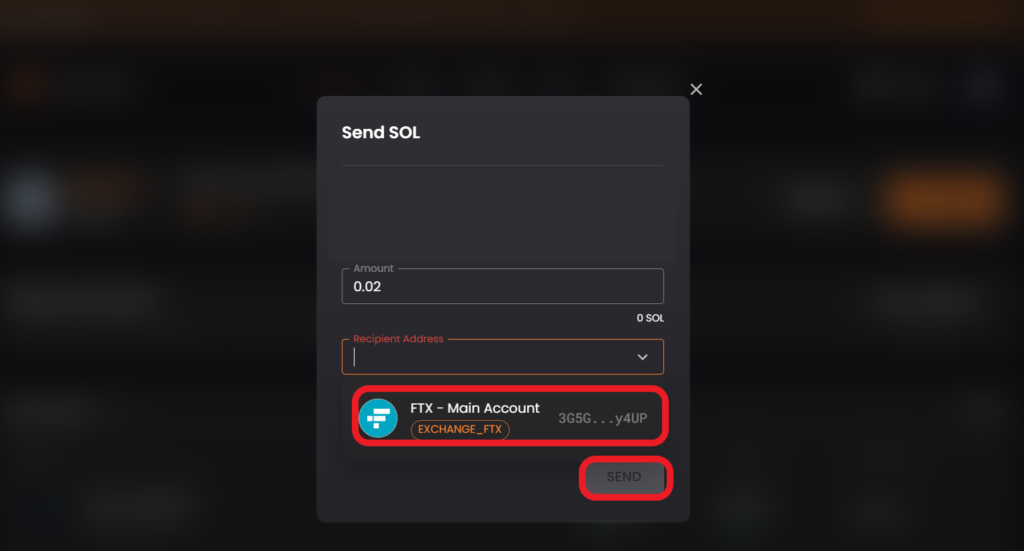
Now, you need to enter the amount of SOL to be sent and select your Solflare account by clicking the “Recipient Address” dropdown.
Then, again click “Send”.

Now, you need to confirm the transaction by entering the 2FA code and FTX withdrawal password.
To transfer crypto from Solflare to FTX instantly, you need to switch to your Solflare account in your Solflare Wallet by clicking the “Profile Icon”.
Then, click “Send”
Now, you need to enter the amount of SOL to be sent and select your FTX account by clicking the “Recipient Address” dropdown.
Then, again click “Send”.

With FTX integration with Solflare, you only need to pay the network fee (0.000005 SOL).
Conclusion
To experience the benefits of FTX integration with Solflare, you need to connect FTX to Solflare Wallet account.
Once you have established a connection between FTX and Solflare accounts, you could enjoy the benefits of faster and seamless transfers of crypto and swaps. You can also interact with Solana dApps like never before.
At this time of writing this article, you cannot connect FTX with your Solflare account by using the Solflare mobile application.