TronLink wallet is a non-custodial digital cryptocurrency wallet for Tron blockchain.
It allows you to access dApps, store NFTs, swap tokens, and stake Tronix (Tron).
TronLink supports Ledger hardware wallet.
TronLink wallet is available as an extension as well as a mobile application (Android and iOS).
To use TronLink wallet, you need to download the extension.
Then, you need to create your wallet account.
The account creation process includes setting a new password and backup the seed phrase.
Steps to Create and Use TronLink Wallet
- Download the TronLink Extension
- Click on “Create Wallet”
- Set Wallet Name and Password
- Backup and Verify the Seed Phrase
- Use TronLink Wallet
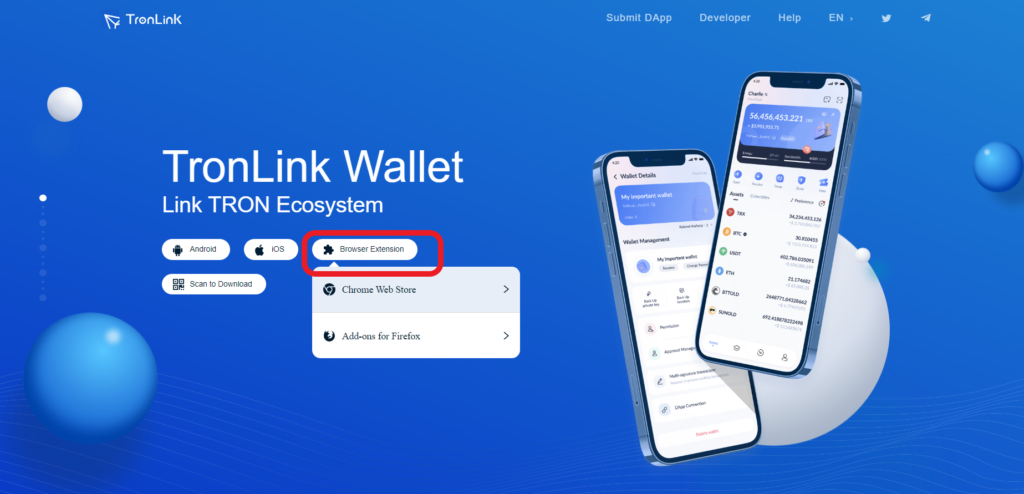
1. Download the TronLink Extension
TronLink wallet is available as an extension for Chrome and Firefox.
To download the TronLink wallet, you need to go to the TronLink website.
Hover to the Browser Extension on the front page.
Choose your browser option and install it.
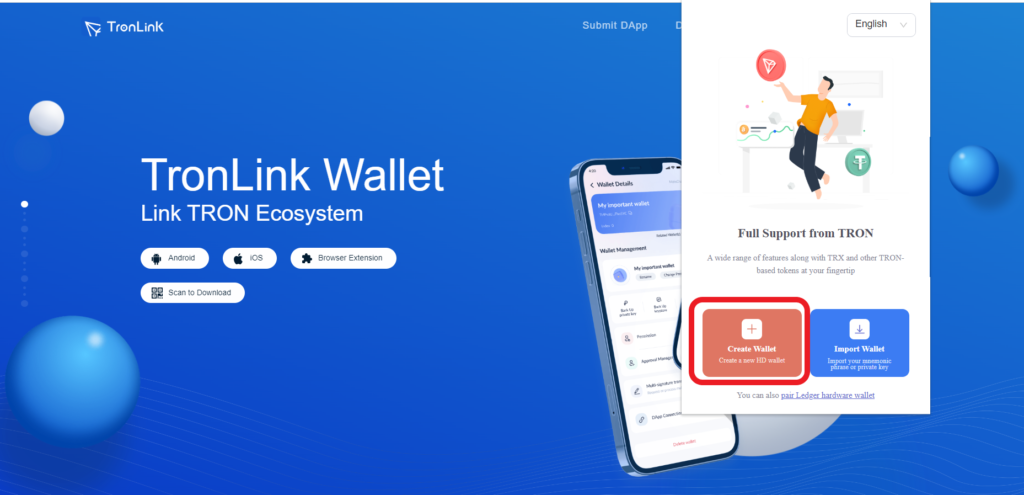
2. Click on “Create Wallet”
After downloading the wallet extension, you need to open the TronLink extension.
To open the extension on Chrome, you need to click on the puzzle icon at the top right corner of the web browser.
Then, navigate to TronLink and click on it.

Then, click on “Create Wallet” on the TronLink extension.
3. Set Wallet Name and Password
After clicking on Create Wallet, you will be able to see the User Agreement.
Read the agreement till last and click on I agree, no more reminders.

Now, you need to set the Wallet name and Password.
The password must be a combination of numbers, characters, uppercase, lowercase, and greater than or equal to 8 characters.
Lastly, click on Create Wallet.

4. Backup and Verify the Seed Phrase
Next, you need to back up the seed phrase as it will be the only way to recover your assets under all circumstances.
To view and back up the seed phrase, you need to enter the password that you have set in Step 3.
Click Confirm.

Then, click Back up.
Now, you will be able to see your seed phrase.
Ensure to write it up on a piece of paper and store it safely. Follow the best practices for storing and securing your seed phrase, also known as the recovery phrase.
Then, click Backed up.

Now, you need to verify the seed phrase as the wallet will ask you to select the word at a particular place.
Select the appropriate word and click Next.

5. Use TronLink Wallet
After creating a TronLink Wallet account, you can see your wallet address and account balance on the top of your TronLink Wallet page.
Just below that, you can see Send, Receive, Vote, Stake, and Swap buttons.
You can store your TRX, TRC-10, TRC-20, and TRC-721 tokens.
You can even swap for tokens such as USDC, USDT, TUSD, BTC, ETH, SUN, etc using the TronLink wallet.
Right underneath, you will be able to see two tabs: Asset and Collectibles.
If you want to connect your TronLink Wallet with Ledger, you need to click on the gear icon in the top right corner.
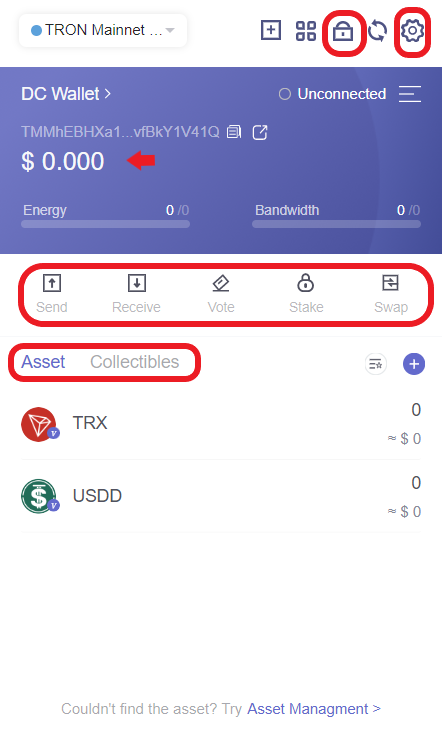
Then, click on Ledger Connection.
If you want to lock your TronLink Wallet, you need to click on the lock icon in the top right corner.
Ensure to remember the password and store your seed phrase before locking the wallet.
Conclusion
Installing and creating a TronLink Wallet account is a simple task.
Setting up the password and backing up the seed phrase are the two essential steps involved in creating the TronLink account.
Anyone with your seed phrase can access all your assets.
Hence, always remember to store your seed phrase in multiple places to prevent it from losing. If you lost them, nobody can access your account—even TronLink developers.
You can also use Trust Wallet to store TRX.
FAQ
1. Is TronLink safe?
TronLink is a decentralized digital wallet—meaning data is stored on the user’s local device and it is protected by the private key and multi-layer algorithm encryption.
It also has a multi-signature feature.
