
Disco Diffusion is one of the machine learning models that convert text to image. With Disco Diffusion, you can not only create images from prompts but also videos! This AI art generator is similar to Stable Diffusion.
Disco Diffusion is written in Python by Somnai, an artist, designer, and coder. It requires the Google Colab notebook to run.
If you are not familiar with the Google Colab notebook, don’t be intimidated by its user interface. This article will ease the process of using Disco Diffusion in Google Colab notebook.
Google Colab notebook is a product of Google Research that allows anyone to write and execute arbitrary Python code online. It is well suited for machine learning, data analysis and education.
How to Use Disco Diffusion for Free?
To use Disco Diffusion, you need to be signed in with your Google account on your browser.
Then, head to Disco Diffusion tool that is presented in the Google Colab.
Next, make a copy of the Disco Diffusion file into your Google Drive.
That’s it. You are all set to use the Disco Diffusion AI for free.
Steps to Use Disco Diffusion for Free
- Open Google Colab and Save a Copy in your Google Drive
- Check the Google Colab uses GPU
- Use Tesla P100 or Tesla T4 GPU
- Run Everything Until “Prompts”
- Enter your Prompt and Run Diffuse!
- Wait for the Image to be Generated
- Locate the Disco Diffusion AI Generated Images
1. Open Google Colab and Save a Copy in your Google Drive
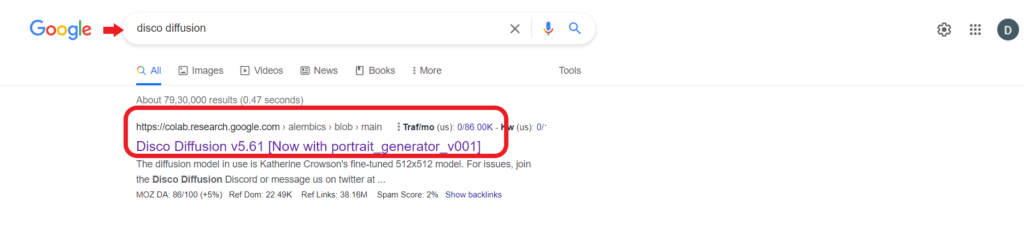
Type “Disco Diffusion” into Google and click the first link.
Once you have opened the Disco Diffusion presented in the Google Colab, you need to make a copy of it into your Google Drive.
To do so, click “File” and then click “Save a copy in Drive”.

Now, your copy of Disco Diffusion will open in a new tab. This is where you will be interacting with the Disco Diffusion model. Hence, you can close the old tab.
2. Check the Google Colab uses GPU
The graphics processing unit (GPU) is essential to run the Disco Diffusion model as well as other machine learning models.
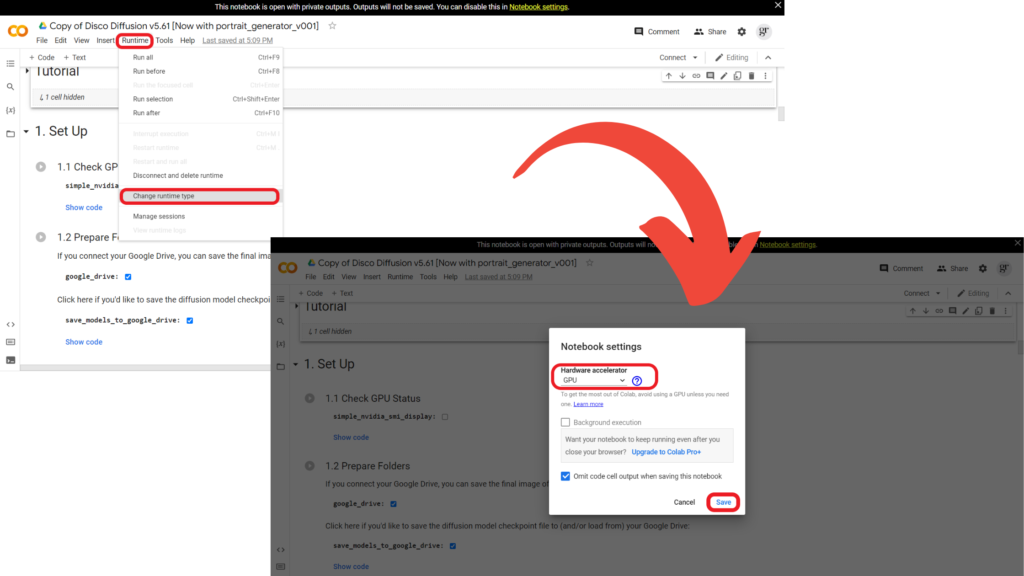
By default, Google Colab notebook will allocate a GPU for you. To check whether you have been allocated with a GPU or not, click “Runtime” and see “GPU” is selected under “Hardware accelerator”.
If GPU is selected, click “Save”. Otherwise, select the GPU manually from the dropdown.
3. Use Tesla P100 or Tesla T4 GPU
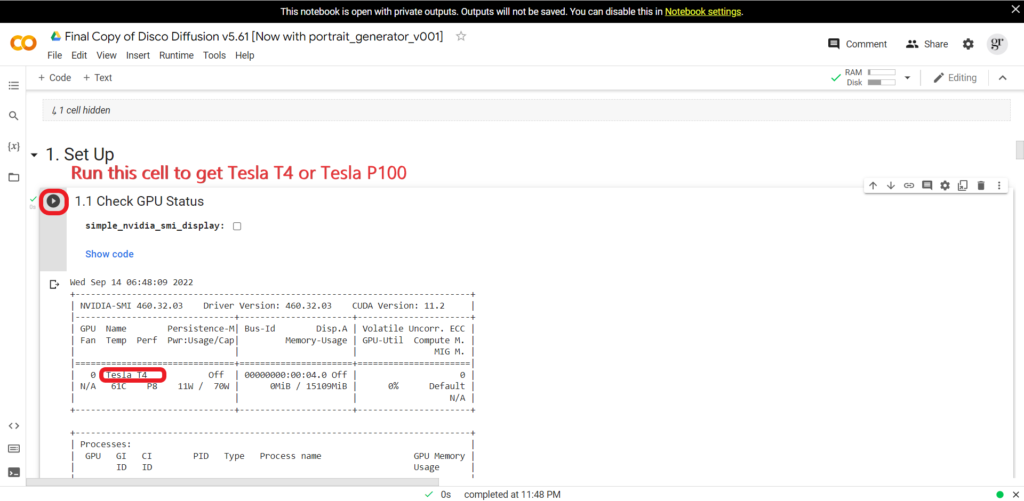
There are three GPUs available, namely Tesla K80, Tesla P100, Tesla T4 in Google Colab. Based on the availability, it will randomly allocate any one of the GPU’s.
Among these GPU’s, the Tesla P100 and Tesla T4 will perform faster than the Tesla K80. However, in the Google Colab free version, you will mostly get the Tesla K80 GPU.
But, fortunately, there is a way to get a Tesla P100 or Tesla T4 GPU.
To get the Tesla P100 or Tesla T4 GPU in the Google Colab notebook,
- Click the “Down arrow” in the top right corner of the Colab tab. Then, click “Manage session”. Now, you need to terminate your active session by clicking on “TERMINATE”.
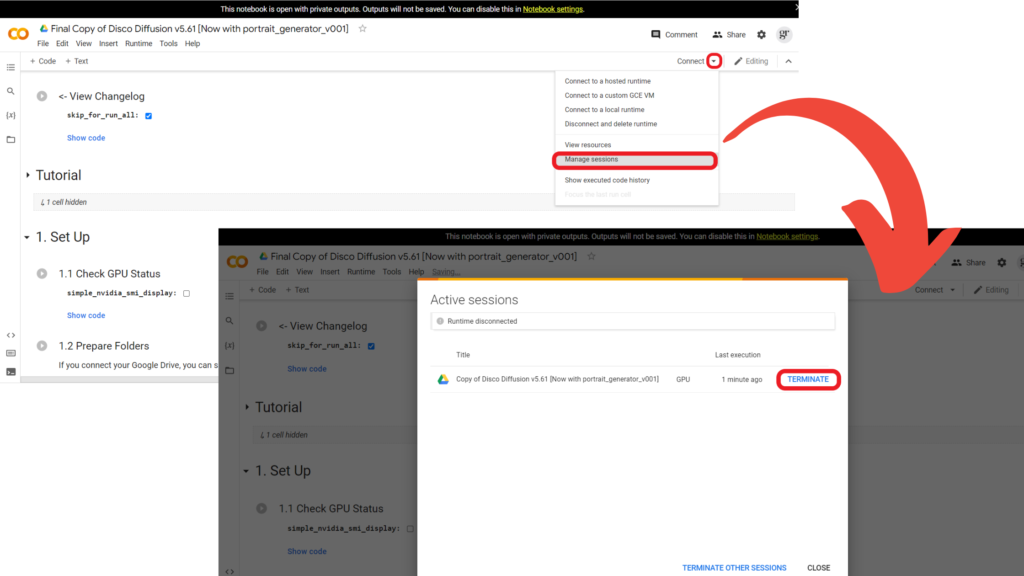
- Then, you need to start a new session. To do so, run the “1.1 Check GPU Status”.
- Repeat this process until you get Tesla T4 or Tesla P100
At some point, you will get to see “Notebook requires high RAM” notification, just click “Ok”.
4. Run Everything Until “Prompts”
Next, you need to run each section until you reach the “Prompts”. I.e., 1.2 to “Extra Settings”.
Meanwhile, while running the “1.2. Prepare Folders”, you will need to permit this notebook to access your Google Drive. To save the final image of each run on your Google Drive, you must connect your Google Drive to Google Colab.

5. Enter your Prompt and Run Diffuse!
Once you reach the “Prompts” section, by default, there will be a prompt as shown in the below image.

You can remove that prompt and enter your own prompt like this:

Now, a tune-up is needed to perform. For this, you need to know about the two attributes of Disco Diffusion.
- Display_rate: It is used to show the result of the AI-generated artwork in particular stages. For example, if you set the display_rate as 20, you will get to see the output every 20 steps.
- n_batches: It represents the number of images that Disco Diffusion will create for your prompt. The default value for this will be 50. But, my suggestion would be 1 to 5. Otherwise, it takes a very long time to generate the artwork.

Now, run the “Prompts” section followed by run the “Diffuse”.
6. Wait for the Image to be Generated
Now, all you have to do is wait for some time to get the AI-generated image. For me, the Disco Diffusion took 16 minutes and 6 seconds.
You can find whether your prompt is getting executed or not by seeing the status in the upper right corner of the Colab browser tab. If the status is showing some amount of RAM and Disk, your prompt is under execution.
You can also confirm this just by scrolling down to the bottom of the “4. Diffuse” to see the percentage of steps.

If the status is “Busy”, it is waiting to finish the current execution.
To get desktop notifications for the completed execution, make sure to select the corresponding check box in “Settings” and allow the browser to show the notification.

Once the image is generated, you can right-click and save it to your computer.

7. Locate the Disco Diffusion AI-Generated Images
You can locate the Disco Diffusion AI-generated images in your Google Drive as well as in your Colab notebook.
To access AI-generated images in your Google Drive, go to your Google Drive.
You can find the folder called “AI”. Then, AI > Disco_Diffusion > images_out > TimeToDisco.
Alternatively, you can access your Google Drive from inside the Google Colab notebook.
To do so, you need to run the cell just above the “Create the Video”.
Then, click the “folder icon” and navigate to drive > MyDrive > AI > Disco_Diffusion > images_out > TimeToDisco.

FAQ
1. How to fix “RuntimeError: CUDA error: misaligned address”?
The full error message is
“RuntimeError: CUDA error: misaligned address CUDA kernel errors might be asynchronously reported at some other API call,so the stacktrace below might be incorrect. For debugging consider passing CUDA_LAUNCH_BLOCKING=1.”
The RuntimeError: CUDA error: misaligned address error occurs when you are trying to use the ViTL14 model with the Tesla T4 GPU. ViTL14 model and Tesla T4 GPU are not compatible with each other.
To fix this error, you need to go for the Tesla P100 GPU if you want to use the ViTL14 model.