Uniswap is an automated market maker (AMM) that is built on the Ethereum blockchain.
Users can create liquidity pools, provide liquidity, and swap assets.
Uniswap is managed by a group of people who holds UNI tokens.
To use Uniswap, you need to connect a decentralized crypto wallet.
Uniswap supports wallets, such as MetaMask, WalletConnect, Coinbase Wallet, Fortmatic, and Portis.
In this article, we will be using the MetaMask wallet.
To connect MetaMask to Uniswap, you need to install the MetaMask wallet.
Make sure you are in the Ethereum Mainnet.
Next, click Connect Wallet on the Uniswap webpage.
Allow Uniswap to connect with your MetaMask wallet by clicking Connect.
Steps to Connect MetaMask to Uniswap
1. Install MetaMask
If you have already installed MetaMask, you can skip this step.
First, download MetaMask.
After downloading MetaMask, you need to set up your account.
The account setup process includes creating a password and storing your recovery phrase.
For further clarification, you can refer to this guide: How to Create a MetaMask Wallet: A Step by Step Guide.
2. Click Connect Wallet
Go to Uniswap.
Click on the Launch App located in the upper right corner of the webpage.

Then, you will land on the Swap window with tabs such as Pool, Vote, and Charts.
Now, you will be able to see Connect Wallet in the upper right corner.
Click on it.
It will show you the multiple wallet options.
Click on MetaMask.

3. Allow to Connect
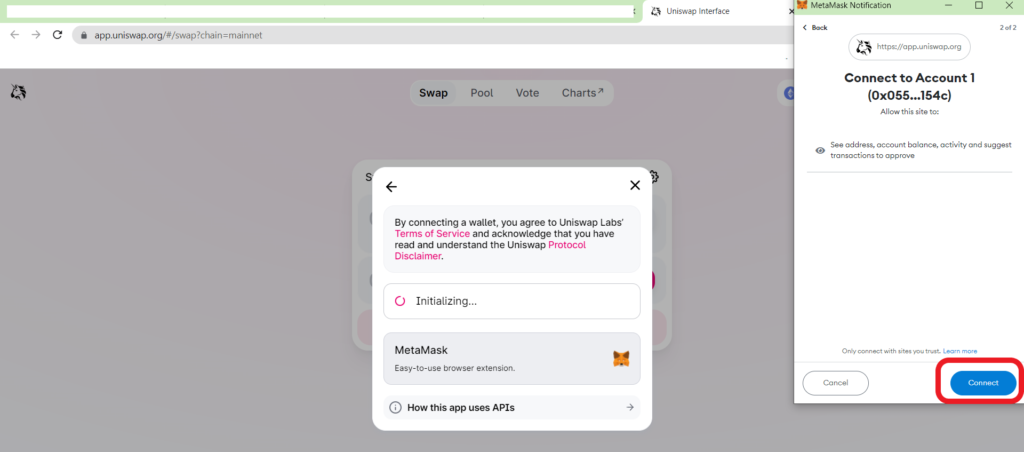
Once you have selected the MetaMask wallet, a MetaMask pop-up will open up.
Now, you need to select your MetaMask account.
If you are having only one account, ensure that is selected and click Next.

Next, MetaMask will show you the permission request.
The permission allows Uniswap to see your wallet balance, activity, and send requests for transactions.
But Uniswap cannot move funds without your knowledge.
So, click on Connect.
That’s it. You have successfully connected your MetaMask wallet to Uniswap.
On the successful completion of this process, you will be able to view your partial wallet address in the top right corner of the webpage.

4. Swap
Now, select the token that you want to swap.
In the second field, click Select a Token and then select the token that you want to swap for.
Lastly, click Swap.
A confirmation pop-up will come from your MetaMask wallet.
Click Confirm.
Steps to Connect MetaMask Application to Uniswap
1. Install MetaMask Mobile Application
If you have already installed the MetaMask application, you can skip this step.
First, download MetaMask mobile application.
MetaMask is available on Android and iOS.
After downloading MetaMask, you need to set up your account.
The account setup process includes creating a password and storing your recovery phrase.
If you already have an account, you can import it using your recovery phrase.
For further clarification, you can refer to this guide: How to Create a MetaMask Wallet: A Step by Step Guide.
2. Select UniSwap
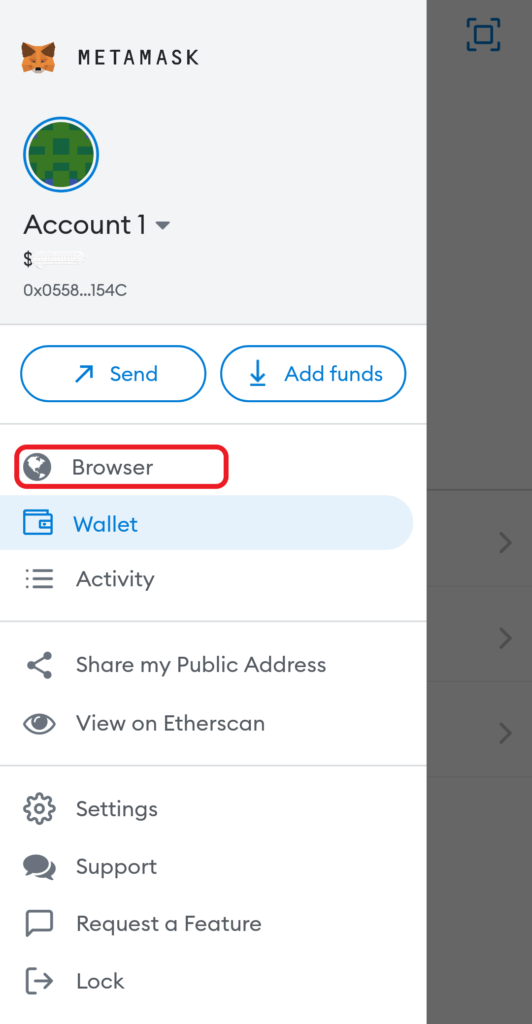
Open the MetaMask mobile application.
Tap on the three parallel lines in the upper left corner of the application.
Now, you will be able to see multiple options.
Tap on Browser.
There you will be able to see Decentralized exchanges under Explore sites.
Tap on it.

Now, scroll a bit to find Uniswap.
Tap on Uniswap once you have found it.

3. Allow to Connect
As soon as you tap on Uniswap, a pop-up will open up.
Tap on Connect.
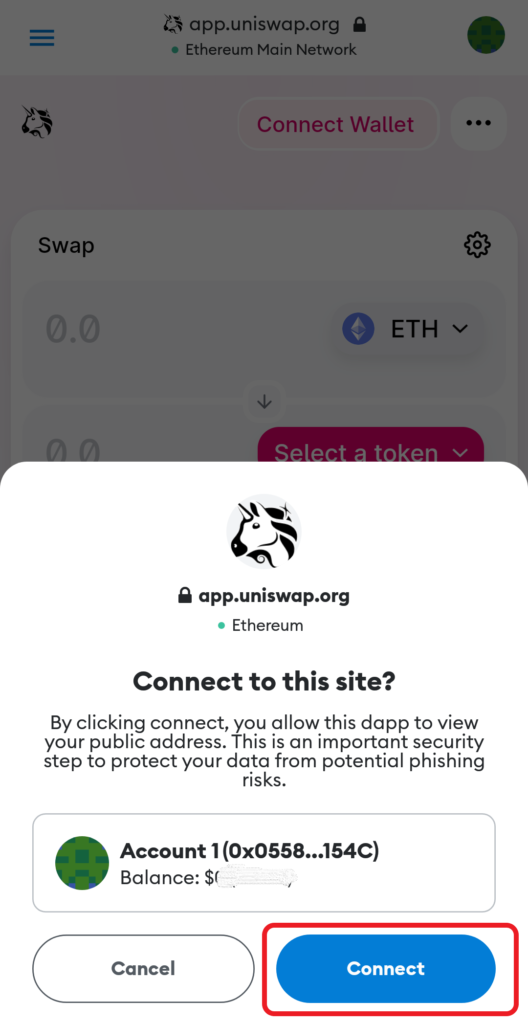
That’s it. You have successfully connected your MetaMask application to Uniswap.
On the successful completion of this process, you will be able to view your partial wallet address in the top right corner of the webpage.

4. Swap
Now, select the token that you want to swap.
In the second field, click Select a Token and then select the token that you want to swap for.
Lastly, tap on Swap.
A confirmation pop-up will come. Click Confirm.
Conclusion
After establishing the connection, you can swap your token for another ERC20 token or you can stake your token in liquidity pools.
Once you are swapped or staked your tokens, always ensure to disconnect your wallet from Uniswap.
There is no manual Disconnect option in both the Uniswap interface and the MetaMask. Your MetaMask wallet will automatically disconnect after a few minutes/ hours.
To manually disconnect in MetaMask wallet extension, click on the three dots in the upper right corner of your MetaMask wallet.
Then, click on Disconnect.

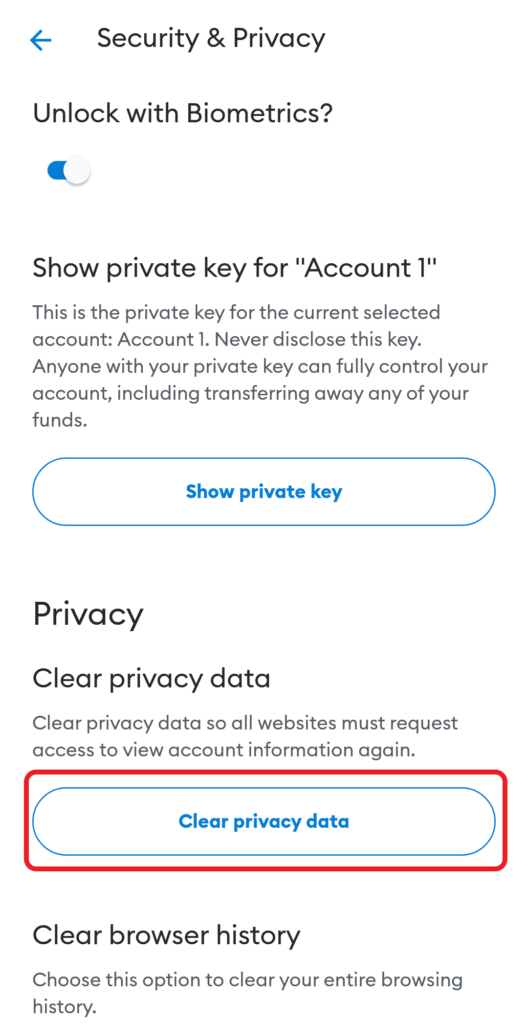
To manually disconnect in MetaMask mobile application, go to Settings.
Tap on Security & Privacy.
Then, navigate to Clear Privacy Data and tap on it.
This will remove all connected sites to your MetaMask wallet.
FAQ
1. How to fix “Permissions request already pending please wait” issue in MetaMask?
Users face “Permissions request already pending please wait” issue while connecting with DEXs, such as Uniswap or PancakeSwap.
To fix this, click on the three dots in the upper right corner of your MetaMask wallet.
Then, navigate to the DEX or dApp that you are connected with and click on Disconnect.
And, try connecting again.
On MetaMask mobile application, you need to uninstall and reinstall the application.
And, try connecting again.
Ensure to have your Seed Phrase and private keys (imported accounts) safely backed up before the uninstallation process.
