![View NFTs in MetaMask ["Autodetect NFTs" Feature?]](https://decentralizedcreator.com/wp-content/uploads/2022/08/View-NFTs-in-MetaMask-Autodetect-NFTs-Feature-1024x576.png)
MetaMask Wallet extension is not compatible with NFTs. Hence, you can’t actually view the NFT in the MetaMask browser extension. However, you can see the entry of your NFT on it.
To view your NFTs, you must use the MetaMask mobile application. The MetaMask mobile application will display the NFTs under the “NFTs” tab.
MetaMask has released a feature called the “NFT Auto Detection”.
Enabling the NFT detection feature will display your NFTs from OpenSea automatically. However, this feature is currently for “Ethereum Mainnet” only.
If you can’t see your NFTs even after turning on the autodetect feature of MetaMask or you want to view your Polygon or Binance Smart Chain NFTs or NFTs from marketplaces other than OpenSea, you must add those NFTs manually.
How to View NFTs in MetaMask Wallet?
To view NFTs in MetaMask, you need to enable the “Autodetect NFTs” feature.
If that doesn’t work, you need to copy the NFT’s contract address and token ID from the listing page.
Then, download the MetaMask mobile application and tap on “Import NFTs”.
Next, paste the NFT contract address and ID to import it.
Now, you can view your NFT in the MetaMask Wallet application.
Steps to View NFTs in MetaMask
- Enable “Autodetect NFTs” Feature
- Copy NFT Contract Address and Token ID
- Install MetaMask Mobile Application
- Navigate to “NFTs” Tab
- Paste the Contract Address and ID
1. Enable “Autodetect NFTs” Feature
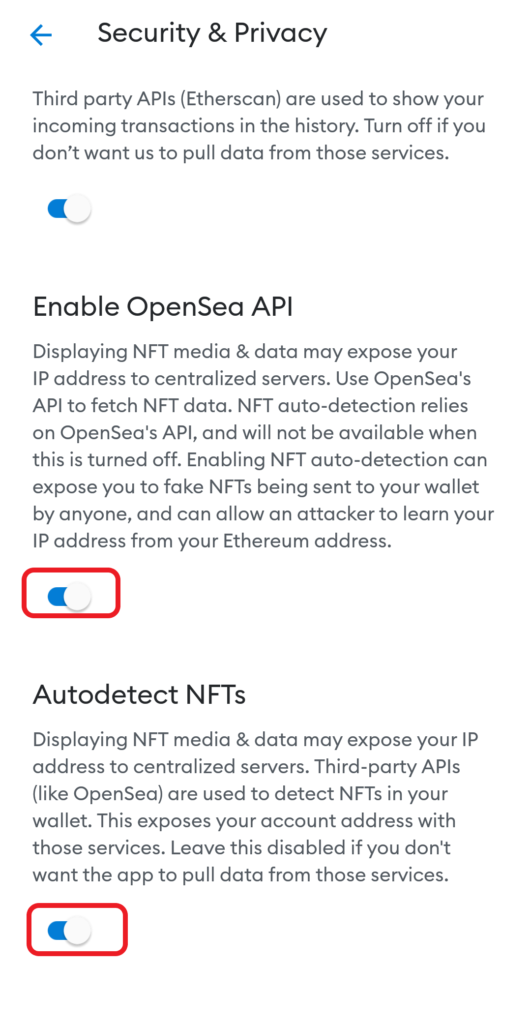
To enable the “NFT Auto Detection” feature, go to “Settings” in the MetaMask mobile application.
Then, tap on “Security & Privacy” and scroll down to the bottom of the page.
Now, you need to see the “Enable OpenSea API” and “Autodetect NFTs” options. Flick the “toggle icon” of both options to turn on autodetect.
Now, go to the “NFTs” tab to view your NFTs.
In case you cannot view your NFTs there, you need to follow the below steps to add them manually.
2. Copy NFT Contract Address and Token ID
To find and copy the contract address of your NFT, you need to go to the listing page.
You could have bought this NFT on OpenSea, Rarible, or any of the best NFT marketplaces. Go to the NFT marketplace where you bought your NFT.
In this article, I will use the OpenSea NFT marketplace since my NFT is on it.
Once you have gone to the website of the NFT marketplace, you need to connect your wallet to locate your NFT.
To connect MetaMask to OpenSea, you can refer to this step-by-step article.
After establishing the connection, you need to go to the “Collected” section by clicking the “Profile Icon”.
Then, click on your NFT and scroll a bit down to reach the “Details” tab.
Now, expand the “Details” tab to copy the “Contract Address” and “Token ID”.

You can also locate your NFT without connecting your wallet by searching for the ID or exact name of your NFT.
3. Install MetaMask Mobile Application
If you have already installed the MetaMask mobile application, you can skip this step.
The MetaMask application is available for Android and iOS.
After the installation, if you already have a MetaMask account, tap on “Import using Secret Recovery Phrase”.
If you don’t have an account, you must create a MetaMask account by tapping on “Create a new wallet”.
The MetaMask account creation process will consist of two steps: setting a new password and backing up the recovery phrase.
4. Navigate to “NFTs” Tab
By default, after the installation, you will be on the “Ethereum Mainnet”.
Make sure to switch over to the same network as your NFT.
If your NFT is on Polygon, you need to be on the Polygon Mainnet. If you want, you can check out these articles on how to add networks to MetaMask: add Polygon network to MetaMask or add BSC network to MetaMask.
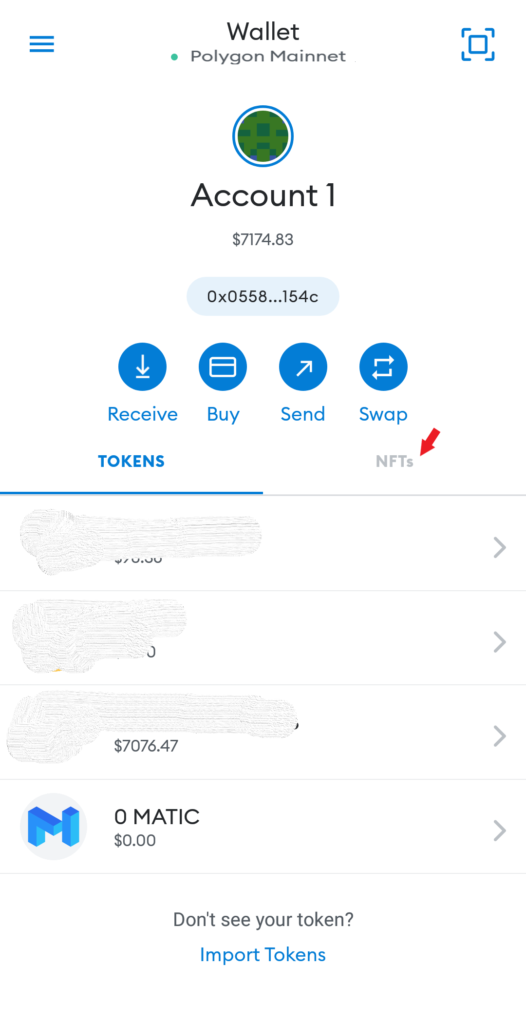
Now, by default, you will be on the “Tokens” tab. But, you need to navigate to the “NFTs” tab.
5. Paste the Contract Address and ID
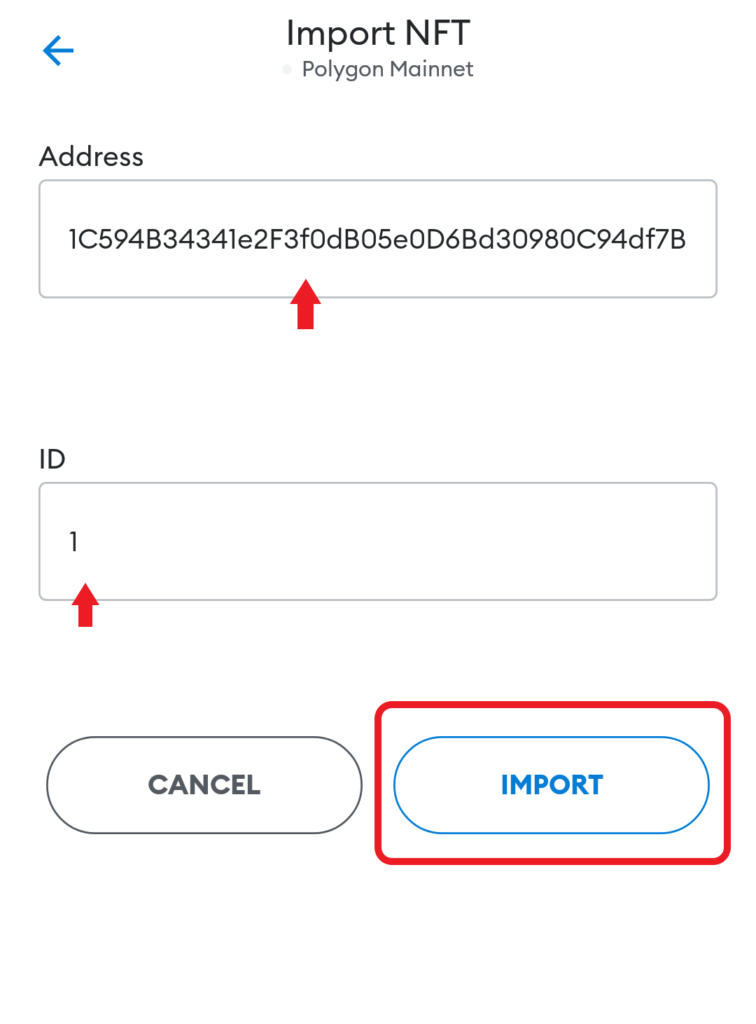
Now, you will be able to see the “Import NFTs” option at the bottom of the NFTs page.

Now, you need to paste the “Contract Address” and “Token ID” that you copied in Step 1.
Lastly, tap on “Import”.
By tapping on the Import, you will be able to see your NFT under the “NFTs” tab.
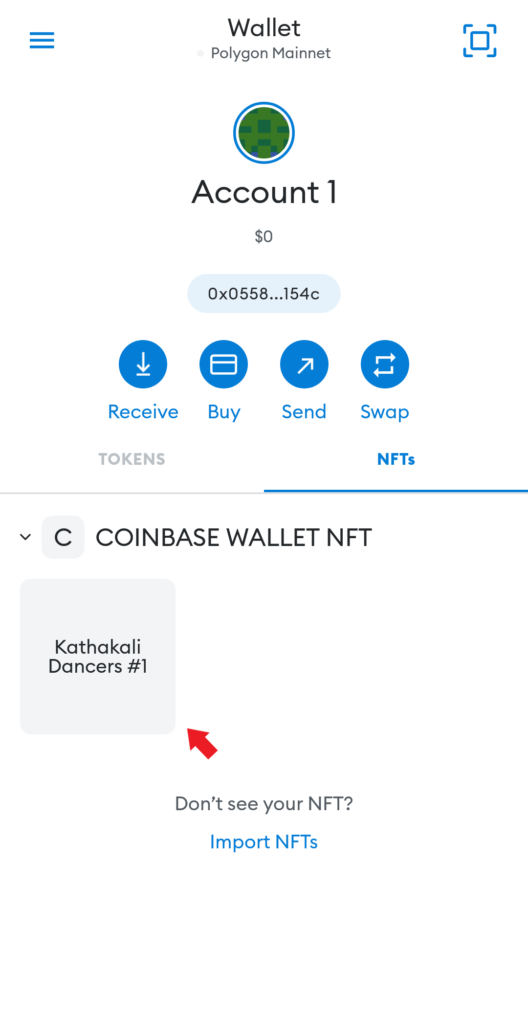
Note: Some of the NFTs may not appear correctly. However, you can see their existence.
Conclusion
Viewing your NFTs in MetaMask has been made easy with a feature of “Autodetect NFTs”. However, this feature is meant for the Ethereum network only.
There may be a chance that your NFT is not visible in MetaMask even after turning on the automatic NFT detection feature or if your NFT is not based on Ethereum or you have purchased NFTs other than OpenSea marketplace.
In those cases, you need to import it manually as mentioned in this article (Step 2-Step 5).
FAQs
1. Why can’t I turn on the “Autodetect NFTs” feature on MetaMask?
The “Autodetect NFTs” feature on MetaMask completely relies on OpenSea’s API and will not be available when the API is turned off. Hence, you must turn on the “Enable OpenSea API” before turning on the “Autodetect NFTs” feature.
2. Why can’t I be able to see the “Autodetect NFTs” feature on my MetaMask?
The “Autodetect NFTs” feature on the MetaMask will not visible if you:
- Are on the MetaMask Wallet extension
- Are on networks other than “Ethereum Mainnet”
- Have not updated your MetaMask mobile application
The “Autodetect NFTs” feature on the MetaMask is available only for the Ethereum network.
