Switching networks in MetaMask helps users to access different EVM-compatible chains like BSC, Polygon, and many more.
If you want to change/ switch networks in MetaMask, for example from Ethereum Network to Binance Smart Chain Network. We have covered it in the following guide.
Switching Network on MetaMask – Chrome Wallet
Options 1:
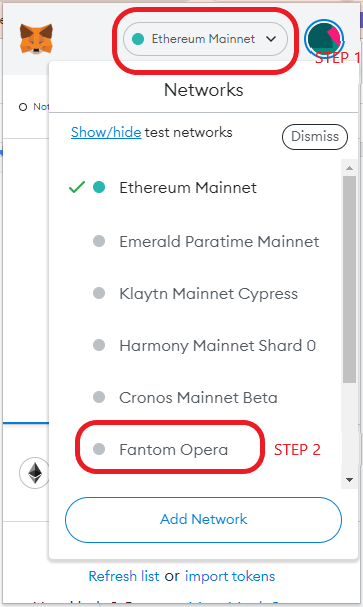
- Open MetaMask
- Click on Network next to Profile
- Select the Network
- You have been switched to the selected Network
Options 2:
- Open MetaMask
- Click on Network next to Profile
- If Network is not available. Click Add Network at the Bottom
- Enter Network Details and Click Save.

Switching Network on MetaMask – Mobile
Options 1:
There are two ways to change the network in MetaMask Mobile.
If the network has been already created, then you can click Wallet Icon on the top screen and choose the network you need.
Right now, you have been switched to the Network you have selected.

Options 2:
What if the Network is not shown. Then you have to add the network to the MetaMask. The following steps help you to change the network in MetaMask Mobile
- Open MetaMask
- Click the 3 Layered button on the top left of your screen
- Click “Setting”
- Select the Network Option
- Click “Add Network”
- Fill out Network information and Click “Add”
- Check out

Switch to Binance Smart Chain ( BNB ) on MetaMask
To add Binance Smart Chain (BNB) on MetaMask. You have to add BNB Network Details to MetaMask Wallet.
If the Binance Smart Chain ( BNB) Network details has been already added. Then you can
- Click Wallet on the Top of the Screen
- Choose Binance Smart Chain Mainnet Network.
- You have switched to Binance Smart Chain Mainnet in MetaMask. Right now you can send and receive BNB
If the Binance Smart Chain ( BNB) Network details has not been added. Then you have to follow these steps
- Go to Setting
- Select Network Options
- Click Add Network
- Enter the BNB Network Details
You can check out our detailed guide on How to add Binance Smart Chain ( BNB ) Network on MetaMask.
Binance Smart Chain Network Details
| Network Name | Binance Smart Chain Mainnet |
| New RPC URL | https://bsc-dataseed1.binance.org |
| Chain ID | 56 |
| Currency Symbol | BNB |
| Block Explorer URL ( optional ) | https://bscscan.com |
Switch to Polygon (MATIC) Network on MetaMask
To add Polygon(Matic) Network on MetaMask. You have to add Polygon Matic Network Details to MetaMask Wallet.
If the Polygon (MATIC) Network details have been already added. Then you can
- Click Wallet on the Top of the Screen
- Choose Polygon(MATIC) Mainnet Network.
- You have switched to Polygon Mainnet MetaMask. Right now you can send and receive MATIC
If the Polygon ( MATIC) Network details have not been added. Then you have to follow these steps
- Go to Setting
- Select Network Options
- Click Add Network
- Enter the Polygon Network Details
You can check out our detailed guide on How to add Matic Network on MetaMask.
| Network Name | Polygon Mainnet |
| New RPC URL | https://polygon-rpc.com/ |
| Chain ID | 137 |
| Currency Symbol | MATIC |
| Block Explorer URL ( optional ) | https://polygonscan.com/ |
Switch to Ethereum (ETH ) Mainnet Network on MetaMask
To switch back to Ethereum ( ETH ) Mainnet
- Click Wallet on the Top of the Screen
- Choose Ethereum Mainnet Network
- You have switched to Ethereum Mainnet Network. Right now you can send and receive ETH.
Switch to Arbitrum Network on MetaMask
To add Arbitrum One Network on MetaMask. You have to add Arbitrum Network Details to MetaMask Wallet.
If the Arbitrum One Network details have been already added. Then you can
- Click Wallet on the Top of the Screen
- Choose Arbitrum One Mainnet Network.
- You have switched to Arbitrum One MetaMask. Right now you can send and receive ETH
If the Arbitrum ( One ) Network details have not been added. Then you have to follow these steps
- Go to Setting
- Select Network Options
- Click Add Network
- Enter the Arbitrum One Network Details
You can check out our detailed guide on How to add Arbitrum Network on MetaMask.
Arbitrum Network Details
| Network Name | Arbitrum One |
| New RPC URL | https://arb1.arbitrum.io/rpc |
| Chain ID | 42161 |
| Currency Symbol | AETH |
| Block Explorer URL ( optional ) | https://arbiscan.io/ |
Switch to Avalanche (AVAX) Network on MetaMask
To add Avalanche(AVAX) Network on MetaMask. You have to add Avalanche(AVAX) Network Details to MetaMask Wallet.
If the Avalanche(AVAX) Network details have been already added. Then you can
- Click Wallet on the Top of the Screen
- Choose Avalanche(AVAX) Mainnet Network.
- You have switched to Avalanche Mainnet MetaMask. Right now you can send and receive AVAX
If the Avalanche (AVAX) Network details have not been added. Then you have to follow these steps
- Go to Setting
- Select Network Options
- Click Add Network
- Enter the Avalanche Network Details
You can check out our detailed guide on How to add Avalanche Network on MetaMask.
Avalanche Mainnet Network Details
| Network Name | Avalanche Network |
| New RPC URL | https://api.avax.network/ext/bc/C/rpc |
| Chain ID | 43114 |
| Currency Symbol | AVAX |
| Block Explorer URL ( optional ) | https://snowtrace.io/ |
